Print
A traditional specialty from Southern Poland that was the perfect confection for a Winnie the Pooh Themed Birthday party, or, if you are Polish: excellent step by step photos and instructions for making Ciasteczka Ule!
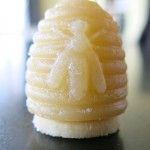
Traditional Polish Marzipan Beehive Confections
A traditional specialty from Southern Poland that was the perfect confection for a Winnie the Pooh Themed Birthday party, or, if you are Polish: excellent step by step photos and instructions for making Ciasteczka Ule!
Prep Time 2 days
Total Time 2 days
Servings 30 hives
Ingredients
Ingredients for the Shell
- 200 g of nuts , ground (walnuts, hazelnuts, pecans, almonds, peanuts)
- 200 g of icing sugar and extra for dusting
- 1 egg
Ingredients for the Cookie Base (1/4 batch)
- 1/2 cup flour (remove 1 1/2 teaspoons to be replaced with cornstarch)
- 1 1/2 teaspoons of cornstarch
- 1/4 cup of unsalted butter
- 2 tablespoons of Berry sugar
Ingredients for the Filling
- 50 grams butter , room temperature
- 50 grams sugar
- 50 grams Advocaat or Mascarpone
Instructions
Instructions for the Shells
-
Prepare cookie sheet covered with parchment paper; combine all ingredients with mixer until dough holds shape
-
Form ingredients into balls, or portion small amount into mold
-
Dust inside mold with icing sugar every time; push dough firmly into mold with index finger of right hand (if right handed) keeping left hand firmly holding mold in place in closed position
-
Push into ingredients with index finger to form hollow cavity for filling, carefully feeling all sides and top of shell to ensure consistent thickness; remove extra dough pushed up bottom edges of mold so mold is ready to sit on flat surface
-
Set mold in closed position on parchment paper; gently open mold to release shell;
-
If one half, or a portion of shell seems to stick, pick up mold with dough in it, place upside down in left had (if right handed) cavity open on top; place index finger inside and press very gently on loosened side of mold while opening it to release resistant side, and it will release; place back onto parchment paper and release from mold
-
Once all 30 shells are released; cure on cookie sheet, uncovered, in the fridge for 24 to 48 hours
Instructions for Shortbread Cookie Wafers
-
Preheat the oven to 325ºF; cover cookie sheet with parchment paper
-
Combine sugar and flour mixture; mix well
-
Work in butter; knead
-
It will be a very small amount; wrap in plastic and refrigerate
-
Roll cool dough to ⅛ inch or very thin on floured pastry cloth using a rolling pin cloth cover
-
Cut out shapes; gently transfer the almost transparent cut outs to cookie sheet
-
Bake for 5-7 minutes, until a very light golden on the bottom (still white on top; see photo of bottoms)
-
Cool on rack; once each beehive is filled place shortbread wafer on bottom, topside up
Instructions for the Filling
-
Remove shells from fridge; with a very sharp knife, or razor, trim excess dough on each shell from seam created by mold
-
Place back in fridge
-
Combine all ingredients and whip until fluffy and voluminous
-
Place into a pastry bag; if alone, use tall glass or vase: place clip at bottom of pastry bag to avoid ingredients spilling out; pull pastry bag over the sides of the glass or vase and fill the bag with the pastry cream
-
Pipe filling into each cavity; closing each with a cookie wafer
Instructions for the Shells with the Thermomix
-
Prepare cookie sheet covered with parchment paper
-
Weigh ingredients into TM bowl; combine for 15 - 30 seconds at speed 3 to 4 until dough holds shape
-
Form ingredients into balls, or portion small amount into mold
-
Dust inside mold with icing sugar every time; push dough firmly into mold with index finger of right hand (if right handed) keeping left hand firmly holding mold in place in closed position
-
Push into ingredients with index finger to form hollow cavity for filling, carefully feeling all sides and top of shell to ensure consistent thickness; remove extra dough pushed up bottom edges of mold so mold is ready to sit on flat surface
-
Set mold in closed position on parchment paper; gently open mold to release shell;
-
If one half, or a portion of shell seems to stick, pick up mold with dough in it, place upside down in left had (if right handed) cavity open on top; place index finger inside and press very gently on loosened side of mold while opening it to release resistant side, and it will release; place back onto parchment paper and release from mold
-
Once all 30 shells are released; cure on cookie sheet, uncovered, in fridge for 24 to 48 hours
Instructions for Shortbread Cookie Wafers
-
Made by hand, so instructions are the same as those above
Instructions for the Filling with the Thermomix
-
Remove cured shells from fridge; using a very sharp knife, or razor blade, trim excess dough extending from seam of each shell
-
Place back in fridge
-
Weigh ingredients into TM bowl; insert butterfly
-
Whip until fluffy and voluminous for 15 to 30 seconds on speed 4
-
Place into a pastry bag; if alone, use tall glass or vase: place clip at bottom of pastry bag to avoid ingredients spilling out; pull pastry bag over the sides of the glass or vase and fill the bag with the pastry cream
-
Pipe filling into each cavity; closing each with a cookie wafer bottom side down for hive to sit upon
Recipe Notes
While shells are curing, prepare the shortbread wafer cookies so that when filled, the cookies are ready to cap each hive and assembly can be completed immediately. Dock each round to avoid air pockets.