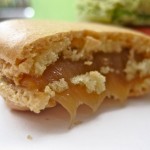
Day Two in Paris: Chocolat, Raspberry and Caramel Macaron

I took a bite of the raspberry macaron first, as it was clear that the butter cream was going to be running all over the place, so what was one to do? Eat them, of course! They really were delicious, but had hardly any raspberry flavour that I could discern. I saw the raspberries go into the butter cream myself, but there were very few for the amount of shells we made. I was not surprised at the lack of intensity. A gel filling would be better, me thinks. Now, how to make one?!
So, we have completed all of our fillings, and each group has the mis en place in place for each kind of macaron. The tant pour tant, or, as Chef Antony consistently referred to it: the “tpt”, is 50% powdered sugar and 50% almond powder (flour). This was a surprise to me, as I thought it was something else from other readings and research. But, all tpt is, is a necessary mixture of half and half. Now, this mixture is not easy to get to the fineness necessary to make a light, crisp shell. And, another surprise from Chef Antony when I asked about this process (as it was already prepared for us): never use a seive or a tami. This will create heat which will make the final product dense. I did notice the friction did create heat when I was using mine, but just used the solid part left at the top of the tami that had melted together for another recipe, and would cherish the laboured over fine grain I had created. Not so good. My shells were probably dense. His tpt feels like mine after the tami, but, no more tami.


I do wish we had been able to see the creation of the tant pour tant as this is clearly fundamental to the development of a proper French macaron shell. His explanation was that it would take too much class time if we had to prepare that, too. I would pay more. I would do it. I believe everyone would who really wants to learn how to make this shell successfully.


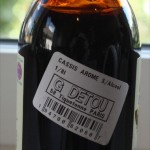
So, we start with the raspberry. I did write down the kind of food colouring he used, but didn’t find it at G. Datou, and he said that powder or liquid was best. Not gel. He used liquid: a lot of liquid food colouring. The whites go into the big bowl of the electric mixer first and are beaten for about a minute on medium to high speed to break them down. The food colouring and the sugar is then added and whipped until stiff peaks form at a medium speed. I was surprised at this.


While the whites (or reds, in this case) were whipping, Chef A prepared the dry ingredients in his food processor. He blended extra sugar with the tpt by tilting the food processor back and forth. I know this doesn’t come in the manual with the instructions, but it was very successful in creating a finely mixed blend. Maybe this is also how the original tpt is also made?


See how much air is incorporating into the whites? I am not sure what point Chef A was making, but certainly one that I have included in the important notes section! I was taking notes as fast as I could while baking and taking photos!


Now, to me, this is past the stiff peaks phase which the recipe suggests, but Antony consistently whipped the white mixture to this consistency with every batch of macarons. I was thankful to get a photo of each at this phase as I thought it was so helpful to see.


The dry ingredients are then added in two portions to make a smooth and light shell. He vigorously incorporated the cry ingredients into the whites by whipping with no apparent attempt to worry about deflating the whites. When Beth asked him if it was important to try to maintain the air in the whites, he passionately shook his head “non”!

Of course he wouldn’t stop his whipping for photos of the texture, but I am using what I have anyway, as they do demonstrate the process. The second half of the dry ingredients are being added below.


This incorporating of the dry ingredients into the wet ingredients is called “macaronage”, and it is obviously very difficult to know when it is ready, or when enough is enough. I would have loved to have gotten the feel of that, but I suspect that I could take a class several times practicing this, and still not have the feel of it.


The truer colour is the one above. It was very difficult to adjust my “golden toned” photos to a true colour, for me. (I will be taking lessons, soon!) Now (below), Chef Antony lifts up the spatuala (over and over dipping into the batter) pronouncing something similar to ‘This is perfect! This is just what you want! Now we are ready!” As this shell turned out beautifully, I am so thankful I have a photo of this critical phase of “readiness”. It is to be shiny and smooth and the give of the whipping just starts to shift, Chef said. I think that bit hanging off of the spatula is an important clue as each one was like this that he did.

Est, voilà ! Into the bag, and we were piping in no time! Convection ovens had been carefully pre-heated to exactly 160º C, or 320º F. A silpat is necessary for macaron, but a perforated cookie sheet is not, according to Chef Antony. Parchment paper can be used, but then water must be poured between the paper and the cookie sheet to release the shells which is messy. And no, they do not need to rest. They can be baked immediately after piping.

I know many disagree with Chef A, and my view is, whatever works, works! After the discs are piped, they should level out on top. If they hold a peak, that is a problem, and they were probably under mixed at the macaronage phase.


See how this disc has levelled out, above?


We all took turns and it was really fun to get out hands onto something.


He told me I was perfect: like a machine! He said I didn’t have the finesse or artistic technique of a Chef, but that after they were baked, the results would be the same. I think I felt my chest puff out a little. “Like a machine” works for me!


I appreciated seeing how he used his hand held spatula to force the batter to the end of the pastry bag to squeeze every drop out onto a cookie sheet. And, some were already in the over. At exactly two minutes, they need to be turned in the oven. Look! There are feet already! And, yes, there should be feet by two minutes, says Chef. Also, be very careful when maneuvering the trays as the shells could slip at this point if you don’t keep the trays level.


I love watching them puff up and grow little feet in the oven. Gorgeous! The must bake for exactly 13 minutes. But, according to your own oven, the span could be from 12 to 18 minutes. You will need to experiment. These are a very sensitive cookie, and the time and temperature is also a very critical part of the process. Your oven will have to be tested cookie sheet by cookie sheet until you achieve success!

The shells below were baked three minutes too long, and you can see they are dry and brown around the edges.


It took them no time too cool, and they were ready for the butter cream. But, we baked all three first.


We had such a wonderful time! Yum! Yum! Yum! Learning something new is always exciting. Especially as this day built more belief within me. That “I can” belief that Béné and Giselle worked to instill within me, too!
Now, for the Salted Butter Caramel Macaron. It is exactly the same as the Rasberry Macaron, except, of courese, the colouring. On this day, Chef had no brown colouring, so was going to use red and black. I did remind him that red and green mad brown. But, maybe not the brown he needed. He did then use red and yellow and blue. In the end, he came up with the perfect caramel colour. None of us could repeat the process, so I think I will need to locate some brown food colouring, fast, as I really love these macarons!

Remember the whites go into the large bowl and are beaten to break them down, then the sugar and colouring is added and they are beaten at a medium speed until they form stiff peaks (and, to me, dry stiff peaks).


While the whites are beating, the tpt is mixed with the sugar in the food processor using a rocking motion (back and forth) until fully blended together. See how much he actually lifts the machine up and pushes it back during this process (below)?


Raspberry shells are still being put into the oven, turned, and pulled out of the oven. Thank goodness for the four people fluent in French that became Chef Antony’s sous Chefs. They understood his requests and jumped to help. The rest of us just wandered where they were going and what they were doing? Again, see the beautiful fine texture of the tpt? (I will never again write tant pout tant: I have been to Lenôtre!!!)


The whites are again ready. See the texture? Exactly the same as the raspberry texture. A little past the stiff peak phase, in my humble opinion.

And now, the macaronage: incorporating the dry ingredients with no worry about maintaining any air in the whites. Remember to do it in two batches for a finer, crisper shell.


And again: voilà ! There is not a big photo here, as no matter how many time I asked for him to please hold still for a second for me to take a photo, he would not. I am sure he didn’t hear me, or thought all of my attempts were enough. Still, you get the idea. The batter is exactly the same as the raspberry batter was: shiny and smooth (to a certain degree).


Ready for immediate piping! Let the fun begin! This time, we all chimed in at once: “May I have a turn!”


I love how there was absolutely no waste. It drives me nuts at home that there is so much left in my pastry bag. I would try to squeeze it all down, and push it with my hand. Using the hand spatula is such a simple solution, I am embarrassed that I didn’t think of it myself. I am also thrilled to know, now, to use it!


Remember to turn all sheets after two minutes in the oven, keeping them level so the shells don’t slip! Aren’t these cute?


What is it about these little delicacies? I am absolutely charmed by them. Sooooo adorable! And this butter cream was deadly delicious. I had thought the salted butter caramel had a bit of a burned taste, even when added to the butter cream, but once on the macaron shell: trés manifique!


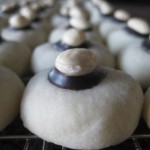
What is happening now? Yes! The ChocolathéMacaron. Here (below) is out mis en place. (I didn’t photograph any one else’s.) I will say here that you can make this shell exactly like the others, and colour it a dark brown instead of adding cocoa powder to the shell ingredients. The flavour does come from the filling, so this may be a good idea if you cannot succeed by using cocoa. Chef Antony told us this after this shell failed. Yes, it failed, even at Lenôtre! He said he made it perfectly at the last class, and that any little measurement off can destroy the result. Well, I can tell you right now that Beth and I are two perfectionists. That was obvious from the get-go. There was nothing mis-measured, Chef Antony (big grin).


I keep testing the tpt to memorize the texture. This time, the cocoa is added to the sugar to be blended with the tpt while the whites are beating.


The whites were whipped to break them down, then red food colouring was added (a lot more than the 5 drops the recipe calls for, but I wasn’t in the position to see how much, and those that were, could only say that it was a lot).


Here is how the tpt and cocoa mixture looked once incorporated. It looks like it needs more work, in my again, humble opinion, as there are clearly white parts showing. But, Chef Antony’s response to this when I questioned him was: “It’s normal.”


The whites are whipped until a dry stiff peak again. This was a very consistent appearance in all three recipes.


Now it is our team’s turn to experience the macaronage phase of this learning. My noble partner, Beth, is really working it! She worked the first half of the dry ingredients. I got to do the second half.


And, just before I felt that I hardly did anything (we probably all felt that way), Chef took the bowl, and finished the job to achieve this perfect point. Now, it did look too dry to me. And also, too “bumpy”, and not as shiny as the other two. But, who am I? And, at this point, Chef did not comment on any concern. I was also probably thinking the same (bumpy-wise) of the other two batches.


Anyway, into the piping bag it went, and out onto the cookie sheets. A good little trick he also shared was to stuff some of the bag into the tip to stop the batter from dripping through. I have always used a clip, but this was very slick and easy. We soon ran out of silpats and had to use parchment. This was probably a good thing, as we learned the technique of spilling water on the table to release the shells from the paper.


After two minutes in the oven, when we went to turn the sheets, these little shells did not have feet. Chef immediately opened all the oven doors and left them open (wide) for at least three to five minutes and what I understood is that the humidity was too high and he needed to release some of it by leaving the door opened. When I asked him about the affect of the drastic drop in temperature I never really got a clear answer. Both translator-students said that he said it would not make a difference, and the temperature would not drop. Neither answer seems sensible to me.


And, in the end, the chocolate macarons did not succeed – door opened, or not. They still tasted “OK”. They were dense and the filling was not nearly as sweet as the other two, but they were still good. Recipes follow below.


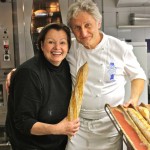
We each left with a beautiful white box filled with 8 caramel, 10 raspberry and 6 chocolate macarons tied with a beautiful Lenôtre ribbon inside of a beautiful Lenôtre bag. Then, upstairs, I bought the only Lenôtre Dessert Cookbook written in English with an incredible chapter on French Macarons! A few other goodies found their way into my bag, too. What an incredible experience. Thank you, Chef Antony!
And thank you, Monsieur Lenôtre! (Is that you?)

Raspberry Macaron
Ingredients:
- 500g tant pour tant
- 200g icing sugar
- 200g egg whites
- 50 drops of red food colouring (2.5ml = 50 drops)
- 3 drops of yellow
- one drop of blue
- 50g caster sugar
Instructions:
- Finely grind the tant pour tant with the icing sugar
- Beat the egg whites for a minute, then add the colour; beat slowly to incorporate; then beat on high speed for 30 seconds and add the caster sugar all at once; continue to beat at medium speed until stiff peaks are formed (see photo)
- Add the ground almond mixture to the stiff egg whites in two batches for perfect texture (1/2 and half)
- Mix vigorously with a spatula after adding each portion of dry ingredients; do not worry about deflating the air just incorporated into the whites (when the consistency is “œperfect” the batter is ready to be placed into a piping bag: this is called macaronage)
- Place ingredients into a piping bag and pipe onto a baking sheet lined with silpat; bake at 160 C in a convection oven for exactly 13 minutes, rotating the pans exactly 2 minutes after they have been placed in the oven (feet should have formed by then (oven temperatures vary and it may take from 12 to 18 minutes to bake these shells)
- Remove silpat from the pan and place shells on it on the counter to cool, immediately; release from silpat when cool and set aside
Salted Butter Caramel Macaron
Ingredients:
- 500g tant pour tant
- 200g icing sugar
- 200g egg whites
- 50g caster sugar
- a few drops of brown food colouring
Instructions:
- Finely grind the tant pour tant with the icing sugar
- Beat the egg whites for a minute, then add the colour; beat slowly to incorporate; then beat on high speed for 30 seconds and add the caster sugar all at once; continue to beat at medium speed until stiff peaks are formed (see photo)
- Add the ground almond mixture to the stiff egg whites in two batches for perfect texture (1/2 and half)
- Mix vigorously with a spatula after adding each portion of dry ingredients; do not worry about deflating the air just incorporated into the whites (when the consistency is “œperfect” the batter is ready to be placed into a piping bag: this is called macaronage)
- Place ingredients into a piping bag and pipe onto a baking sheet lined with silpat; bake at 160 C in a convection oven for exactly 13 minutes, rotating the pans exactly 2 minutes after they have been placed in the oven (feet should have formed by then (oven temperatures vary and it may take from 12 to 18 minutes to bake these shells)
- Remove silpat from the pan and place shells on it on the counter to cool, immediately; release from silpat when cool and set aside
ChocolathéMacaron (about 50-60 double shelled macarons)
Ingredients:
- 500g tant pour tant
- 200g icing sugar
- 25g cocoa powder
- 200g egg white
- 50g granulated sugar
- 5 drops (or way more) of red food colouring
Instructions:
- Grind the tant pour tant, cocoa and the confectioner’s sugar together in a food processor until completely blended and evenly distributed; Chef tipped and tilted his food processor back and forth frequently in a rocking motion to ensure this was happening
- Beat the egg whites for a minute, then add the colour; beat slowly to incorporate; then beat on high speed for 30 seconds and add the caster sugar all at once; continue to beat at medium speed until stiff peaks are formed (see photo)
- Add the ground almond mixture to the stiff egg whites in two batches for perfect texture (1/2 and half)
- Mix vigorously with a spatula after adding each portion of dry ingredients; do not worry about deflating the air just incorporated into the whites (when the consistency is “œperfect” the batter is ready to be placed into a piping bag: this is called macaronage)
- Place ingredients into a piping bag and pipe onto a baking sheet lined with silpat; bake at 160 C in a convection oven for exactly 13 minutes, rotating the pans exactly 2 minutes after they have been placed in the oven (feet should have formed by then (oven temperatures vary and it may take from 12 to 18 minutes to bake these shells)
- Remove silpat from the pan and place shells on it on the counter to cool, immediately; release from silpat when cool and set aside
Important Notes:
- Tant pour tant is an equal amount of icing sugar and almond powder that has already been ground together to the finest possible grain (Never put this through a sieve or a tami as this creates heat and makes the ingredients dense) You can also use a Thermomix, but for no more than 2 minutes, turning it off and on to get the desired fineness
- Egg whites should be placed in the fridge with a plastic cover 2-3 days in advance, and taken out and left on the counter overnight the evening before beginning this process
- 2 drops of fresh lemon juice in the whites at the beginning will avoid the separating of the whites
- 4 tea bags are usually 20 grams of tea
- When turning the shells after two minutes in the oven, ensure you have a good hold of the pan, and that you are holding it in a level position or the shells may move across the tray and spill off of it
- It is ideal to make the ganache 24 hours in advance, and leave it at room temperature to cure
- Chef Antony used a hot “œdrier” 2-3 minutes when beating the butter cream to increase the temperature and decrease the volume (increase evaporation)
- 220g of cream + 20g of tea = 240g of ingredients, but it is important to have 10% evaporation to have a tight ganache, thus the use of the hot blower; that is: 220g of final product when done, if done properly
- If you are using parchment paper, when removing baked shells from the oven, you must immediately pour water between the tray and the baking paper (on the counter is best); wait a few minutes then lift off the macarons and place them on a dry tray
- Store filled shells one day in the fridge without a cover (they will be best the next day); then in a box with a cover for up to 4 days in the fridge: freeze will wrapped and covered for up to two months


Valerie, what a post! This is awesome, but can you believe I’ve never had a macaron? They look wonderful though, and I would have loved to attend that class with you. Nice. I want a raspberry one right now!
Interesting the way Chef Anthony does things very differently from Chef François Schmitt who I had the pleasure of learning from. No silpat for him and a very different piping technique…
Wow! You are in Paris now! You are making good use of your summer. I have been relatively successful at making macarons but I am loving your amazing picture by picture instructions. The raspberry macarons look amazing and it is raspberry season now. Thanks for sharing.
aww, sorry the last batch didn’t turn out. as long as something tastes good then i’m pretty satisfied. sometimes looks can be deceiving. i’ve had many desserts that looked absolutely mouthwatering but had a hard time keeping them in my mouth. so to me, taste is much more important. i’d have to say though, after tasting the ones at the Duchess, i’m addicted. glad to see you’re having such a great time! definitely taking advantage of the opportunity, i likies! 😀
hope you and Vanja have a great time and enjoy the rest of your vacation. have a safe trip back.
Dear VAL! What a post, what an experience. Truly one of life’s GREAT moments 🙂
I am sooooo glad you’re out tehre experiencing this. Expect me over for macaron making classes soon 🙂
Ciao, Devaki @ weavethousandflavors
Valerie, C’est une belle leçon. Merci de le partager avec nous.
Oh, Val..I am so envious of you – macaron lessons at Le Notre? The photos are so wonderful and informative. It’s amazing how many techniques different pastry chefs use to make macarons. I still stick with Tartelette’s (for the most part) but I would trade every foot forward with that recipe for what you are experiencing right now! Looking forward to hearing and seeing more about your vacay!
Val!! I loved this post – thanks for the step by step – it definitely makes me more prepared for my own macaron class! Plus – if the macs fail, I’ll know at least this happened at lenotre too! (by the way, I went to lenotre for a croissant class but I didn’t speak french but someone kindly translated for me) – I am assuming you speak French?
Trissa,
I can understand it if it is slow… but when does one ever speak French slowly, so I am far far far from bilingual! Did you write up the pastry class you went on? Where is the link? I would love to read about it and couldn’t find it on your site.
🙂
Valerie
Okay, I see you used the french mehtod (which i prefer to use) but the problems with my macs is that they all end up hollow on the inside with a big hole underneath each dome. After like 20 attempts, I gave up (no exaggeration). Yours that you made in class look perfect. Do you have any idea why mine always come out like that? Maybe something u learned in class? This post has inspired me to make me want to try again.
I did take a mac class in london, but nobody was able to help me with this. I just blame my oven (cause i can LOL :)).
Would love some advice if you’ve got any.
*kisses* HH
HH:
I will ask my two local macaron experts when I get home. I know humidity is a huge problem. Just a couple of “out there” suggestions: try pans at different times, then the same at different temps (the shells can sit for hours without a problem while you experiment with 2 or three per pan. After that, it could be your humidity…. sounds like a humidity issue, and I have no idea how to solve it.
XO
Valerie
p.s. did u see the macarons at mcdonalds? I hear they make them now.
Hi! I just tried to do these Macarons… they taste great but I had trouble with two things: They came out very thin and after taking them out of the oven, they developed dark spots on the top…. can you help me?????
Wait… you got to make macarons…. in Paris….France…. at Lenotre… THAT is amazing
Yes, I was lucky! And – on a mission: The Quest to Conquer the French Macaroon. It took a couple of years – but, I did it!!!
🙂
Valerie