• Home
  • About
    • Privacy Policy
    • Work with Me
    • Media Kit
    • Evolv Health: Valerie’s Story
    • Personal Stories
    • Press
    • Year in Review
  • Thermomix® Independent Consultant
    • Thermomix® Independent Consultant
    • Client Testimonials
    • Recipes Developed by Valerie
  • Projects
    • Cheesepalooza
      • Cheesepalooza Challenges
      • Cheesepalooza Participants
      • Preparation for Cheesepalooza!
      • Basic Ingredient and Supply List
      • Ingredient and Matierial Suppliers
    • Dueling Daughters Project 2014
    • Eat Alberta
    • Gramsy Glimpses
      • Gramsy Glimpses Vignettes
    • Project 2019: Valerie’s Personal Evolv Health Story
    • Project 2017: Cooking in the Kitchen With….
      • Completed Project 2017 Posts: Cooking in the Kitchen With….
      • Project 2017: Cooking in the Kitchen With… PARTICIPATE
      • Project 2017: Cooking in the Kitchen with….Schedule
    • Slow Food Edmonton Tastings
      • Participate!
    • The Canadian Food Experience Project
      • Participate!
      • Participants
      • Challenges and Round Ups
      • Canadian Food Heroes Series
  • Events
    • Baby Shower
    • Food Blogger Meetings
    • Promotions
    • Restaurant Reviews
    • Reviews (Products, Books, and Events)
  • Philosophy
    • In a Nutshell
    • Local Produce/Producers
    • Slow Food
    • Teaching
  • Travel
    • Bosnia
    • British Columbia
    • California
    • Croatia
    • Culinary Tourism
    • Farmer’s Markets
    • France
    • Greece
    • Hawaii
    • Italy
    • Louisiana
    • Maritime Provinces
    • Massachusetts
    • Mexico
    • Montenegro
    • Nova Scotia
    • Prince Edward Island
    • Quebec
    • Serbia
    • United Kingdom
    • Utah
  • Trends
  • Store
  • Privacy Policy
  • Privacy Policy for A Canadian Foodie
  • Valerie’s Image

A Canadian Foodie

Canadian Food Recipes; Preserving Canadian Food Practices

  • A La Carte
    • Appetizers
    • Drinks
    • Evolv Health Reboot Recipes
      • Reboot Phase 1 Mains
    • Garnishes
    • Salads
    • Sauces Dressings Rubs
    • Sides
    • Soups and Stocks
  • Breakfast & Brunch
  • Cheese
    • Blue/Stinky
    • Firm
    • Fresh
    • Hard/Pressed
    • Cheesepalooza Challenge
    • Cheesepalooza Round Up
  • Desserts
    • Cakes
    • Cookies, Bars and Squares
      • Christmas Cookies
    • Ice Cream, Sorbets and Frozen Yogurt
    • Icings/Frosting and Pastry Creams
    • Other
    • Pies and Tarts
    • Puddings
    • Sweets and Treats
  • Doughs and Crusts
    • Biscuits
    • Bread Buns and Flatbread
    • Crackers
    • Donuts, Frybreads and Such
    • Dumplings etc
    • Pasta
    • Pastry
  • Mains
    • Beef
    • Casseroles
    • Chicken/Duck/Goose/Turkey
    • Marinades and Rubs
    • Pasta Dishes
    • Pork
    • Potluck
    • Savory Pies Pastries
    • Seafood and Fish
    • Stews
    • Vegetarian
    • Veal
    • Wild Game
    • Wraps Pizzas Casual Food
  • Seasonal
    • Autumn
    • Spring
    • Summer
    • Winter
    • Holiday
      • Christmas
  • Gardens
    • Foraging
    • My Garden and From My Garden
    • Preserves
    • Zone Three Harvest
  • Tastings
  • Kids
  • Canadian Food
    • Atlantic Provinces
    • Canadian Aboriginal Food
    • Canadian Berries
    • Canadian Cakes
    • Canadian Doughs
    • Canadian Drinks
    • Canadian Fish
    • Canadian Food Heroes
    • Canadian Food Main
    • Desserts
    • Grandma Maude’s Family Recipes
    • Mom Helen’s Famous Family Recipes
    • Canadian Products
    • Sunday Suppers
    • Wild Food

Thermomix Brioche: an adaptation of Richard Bertinet’s Recipe

December 15, 2010 by Valerie Lugonja 21 Comments

At home with my Brioche Lesson from Le Cordon Bleu in Paris

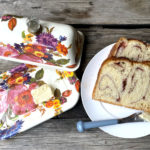
Everything in the TM bowl, the dough was fantastic to work with; the hardest part was ensuring the little head on top was done properly and would sit straight up. No guarantees… they are all in my little pans purchased from Dehillerin in Paris. Rising, for the second time, in their cute little shapes. and voilà! They still look perfect and are ready for the oven!

But I know better. They all looked this perfect in Paris, this past summer, at my bread making Atellier at Le Cordon Bleu. Yet, only the teacher’s came out of the oven “with its head on straight”!

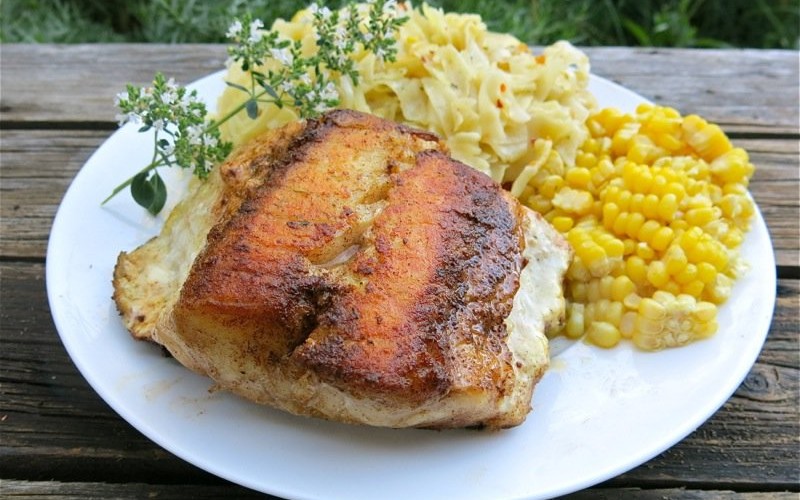
I held my breath, and every one of mine was manifique! I was overjoyed. Look at that colour!

Pretty good crumb, too.

So, let’s revisit my lesson at Le Cordon Bleu in July of 2010. Chef Walters had saved some dough from a previous class and had it brought out of the fridge at the end of the day when we were asking questions. We were  small and efficient class, so had some extra time. Lucky us!

He started to work the dough, but it was too cold, so he just cut it into individual portions. Most only took one. Everyone was offered more. I took three.

He had us warm the dough in our hand and go through the (by now memorized) way to fold the dough like an envelope after flattening it; then roll it into a ball with your hand cupped. Now, the tricky part: making the adorable little head. At this class, so few were successful, as you will see. Thus, my proud smile and wagging tail at the beginning of this post when I so proudly presenting my own homemade brioche: head standing tall!

You can see how Chef Walters uses his baby finger to etch out about 1/4 to 1/3 of the dough ball. Then, continuing to use the side of his hand with gently and even pressure, he forms what looks like a bowling pin. He did it over and over exactly the same way.

But, before we had at it, he showed us how to tuck in the head to get it to stand up straight. You can see above that he has plopped the dough into the form and then uses his forefinger to nestle the head into the ball, upright.

Below, he has completed one side.

In slow motion, he will do the other side.

Do you see how he aims at a 45 degree angle and pushes the space in under the head. He repeats this all around the head and then it sits on top, happily.

You will see it nestled in position, below, right.

This is Chef Walter’s brioche, above. Mine are below… well, his is, too.

Seeing the student brioche forms, and comparing it to my own pan, had me really astounded at how well he had taught us. I was afraid when I began. Not afraid to fail, just afraid I would not learn how to do it better… and then maybe be too discouraged to want to make them again.

This is the Chef’s. He said it was “OK”. He wasn’t happy. I thought it was a masterpiece… but, I do understand. Richard Bertinet’s brioche that he demonstrated for us leaned over when baked. I love the charm in that, too.

He was very happy with the crumb in these, and that might help you to understand why I was so pleased with the crumb in mine! Below are my oven ready brioche… just for a little last minute comparison!

I cannot wait to make them again. I have, actually, a few times, since this… and I am thrilled at how easy they are to make, now that I know how!

Richard Bertinet’s Brioche Recipe (from Crust) adapted for the Thermomix (by moi, above)

Ingredients:

  • 500g white bread flour
  • 50g sugar
  • 15g fresh yeast
  • 10g salt
  • 350g egg (@6 large eggs)
  • 250g unsalted, cold butter
  • egg wash: 1 egg beaten with a pinch of salt prepped one hour before it is needed

Instructions for the Thermomix:

  1. Weight the butter, and cut the butter into small cubes
  2. Lightly grease the brioche tins (or muffin tins) with butter
  3. Scale flour, sugar, yeast and salt into TM bowl; combine for 5 seconds at speed 4-5
  4. Scale in the yeast; combine for 5 seconds at speed 4-5
  5. Scale in the eggs; combine for 30 seconds at speed 4-5 using the spatula through the hole in the lid to keep the dough close to the blade
  6. Knead the dough for 5 minutes on the interval speed
  7. After 2 minutes of kneading, add the butter through the hole in the lid during the next 30 seconds; continue to knead until the time is up
  8. Very lightly dust the work surface with flour; empty the dough completely from the TM bowl onto the lightly floured surface; form into a ball
  9. Place ball into a lightly floured bowl, cover with a cloth and rest the dough for two hours
  10. Turn the dough out onto a lightly floured surface with a scraper (see my Bertinet post for how to do this) and fold; reform into a ball
  11. Replace into the lightly floured bowl and let it rest over night (or 12 to 14 more hours) in a cool place 10-12°F (not a fridge)… (I confess. I did not do this part. I went straight to #14, but resting the dough for this length of time develops the flavour profile and the texture)
  12. Preheat the oven to 400°F
  13. Remove the dough from the cool place to a room temperature space for an hour
  14. Place dough on lightly floured surface and divide into fifteen 70 gram portions; follow the instructions in the photos above to form into a brioche
  15. Place into buttered tins; cover and rise for 2 1/2 more hours
  16. Prepare egg wash an hour before needed: cover each with egg wash and bake for 10 to 15 minutes until dark golden
  17. Remove from tin and place on wire rack to cool

Christian Stinner’s Thermomix Brioche Recipe (as adapted from the Australian Thermomix Cookbook)

Ingredients:

  • 150g sugar
  • 440g milk, warm
  • 10g yeast
  • 5g salt
  • 80g soft unsalted butter
  • 650g  flour
  • 1 egg

Instructions for the Thermomix:

  1. Scale sugar into the TM bowl; pulverize 3 seconds at speed 9
  2. Scale milk, yeast, salt, butter, flour and egg into the TM bowl; mix to combine 10 seconds at speed 7
  3. Set dial to closed lid position and knead for 3 minutes at interval speed
  4. Remove dough to a lightly floured bowl covered with a tea towel; proof until double in size (about 60 minutes)
  5. When risen, heat oven to 200°C or 400°F
  6. Place dough in a buttered bread or brioche tin(s) or weigh dough into 50-60g portions and form into individual brioche (as pictured above)
  7. Let rise again to nearly double in size; brush with an egg wash and sprinkle with sugar, etc, if desired
  8. Bake in hot oven until golden brown and sounding hollow when tapped; about 20-25 minutes for whole brioche and 15-20 minutes for individual ones

Thermomix Brioche Recipe for large “one loaf” brioche form (which is the one I used the second time and it was also fantastic, but a very sticky dough)

Ingredients:

  • 215g flour
  • 6g salt
  • 10g dry yeast
  • 3 eggs
  • 25g castor sugar
  • 40mls milk
  • 135g soft unsalted butter

Instructions for the Thermomix:

  1. Place milk in TM bowl and heat on 37°C for 3 minutes on speed 1
  2. Add all other ingredients and mix on speed 5 for 5 seconds
  3. Turn lid to “closed lid position”; set time for 5 minutes and speed on Interval seeting: knead for 5 minutes
  4. Place mixture in a lightly floured bowl and rise to double in size
  5. When risen, heat oven to 220°C or 425°F
  6. Place dough in a buttered bread or brioche tin forming the little bobble on top per instructions in photos; rise to nearly double in size
  7. Brush with an egg wash and sprinkle with sugar, etc, if desired
  8. Bake in hot oven until golden brown and sounding hollow when tapped; about 20-25 minutes for whole brioche and 15-20 minutes for individual ones

Note: This is a very sticky dough and would be very difficult to form individual brioche with, but it makes an incredibly rich and delicious brioche!

Tip: Sprinkle with Demerara sugar, or dried fruit and nuts before baking

And, in case you think I showed you the only one that turned out…. no, no… no. They all did!

Tweet
Pin30
Share
30 Shares

Filed Under: Bread Buns and Flatbread, Spring, Thermomix® Doughs and Crusts Tagged With: Brioche, Richard Bertinet, Thermomix

About Valerie Lugonja

Like what you see? SUBSCRIBE TO A CANADIAN FOODIE
Educator, Writer, Gardener and Traveler who believes in buying and eating locally, and most importantly cooking at home! As a brand new Gramsy, so be prepared to hear a lot about this new role in her life!
Please connect with Valerie to buy a Thermomix Machine!

« Homemade Tofu with SoNice Organic Soy Milk
Valerie’s Homemade Veal Jus Cubes »

You might also enjoy...

Gooey Hot Chocolate Cookies
Gooey Hot Chocolate Cookies: Ragan Rodgers’ Cookidoo Recipe
Gummy Bears
Gummy Bears Recipe: Gummy Candy is SO make with Thermomix!
Rhubarb Brioche Bread
Rhubarb Brioche Bread with Ragan’s Strawberry Rhubarb Jam
brioche hamburger buns
Brioche Hamburger Buns: Sunday Suppers are Back!
Torta Pasqualina
Torta Pasqualina: Cooking in the Kitchen with Nicoletta and Loreto from SugarLoveSpices

Comments

  1. Daniel@CocinaSavant says

    December 15, 2010 at 6:31 pm

    These are excellent petite little brioches. Your instructions are so very helpful. I must try these very soon.

    Reply
  2. Susan says

    December 15, 2010 at 7:15 pm

    Bravo! Wonderful job! I’m sure you’ve seen my lopsided brioche in my header. I’ll need to take a closer look the instructions 🙂

    Reply
    • Valerie says

      December 15, 2010 at 7:23 pm

      Susan!
      Yes, I have seen your lopsided brioche – and LOVE it. Richard Bertinet’s was lopsided when he demonstrated them to us, and you saw how Chef Walter’s turned out in this post (and he is from Le Cordon Bleu), so… love the lopsided heads! But, that is also why I was tripley thrilled when my little heads were standing at attention!
      What fun!
      🙂
      valerie

      Reply
  3. El says

    December 15, 2010 at 7:27 pm

    Beautiful! Now I want a thermomix!!! I’m not even sure if they sell them in the States but the dough is amazing. Honestly- yours look better than the ones made in the class.

    Reply
    • Valerie says

      December 15, 2010 at 7:40 pm

      El! I know! Wasn’t I lucky!!! They do NOT sell Thermomix in the US”¦ but, should you ever be serious, I sell them and can ship to you within 7 to 10 business days. Lucky me, eh? I have two, I love using mine so much. Mind you”¦ I sell them. I did make the brioche by hand, first. I do believe in doing everything by hand ““ first, so you know what you are looking for and what to do”¦ but after that, hey”¦ I would never be making bread daily and such, with out my Thermomix!
      🙂
      Valerie

      Reply
  4. Tara says

    December 15, 2010 at 10:31 pm

    Did you have the brioche and foie gras at the French Laundry? It was the highlight of the dinner, as far as I’m concerned. 🙂

    Reply
    • Valerie says

      December 15, 2010 at 11:42 pm

      Tara!
      It was the highlight of my dinner there, too. Best brioche ever – and the foie gras is what motivated me to make my own foie gras au torchon! Superb!
      🙂
      Valerie

      Reply
  5. Krista says

    December 15, 2010 at 11:31 pm

    WOW! I am SO impressed! I’ve been wanting to make brioche for ages and just haven’t had a chance. Yours are absolutely gorgeous and I’d love to sink my teeth into one right this very minute. 🙂

    Reply
  6. lequan says

    December 15, 2010 at 11:56 pm

    Hello again 😉

    Honestly, I have never heard of a brioche. They remind me of those Yorkshire pudding. This looks much more complicated than a Yorkshire Pudding though. Then again, I know nothing about baking so I really hope I’m not insulting you by saying it looks like a Yorkshire. Your brioche look beautiful. I really cannot tell which is yours and which is Chef Walter’s. I can tell that this is another one of those things that look and sounds so easy, but when you get to doing it, nothing goes right. The pros always make everything look easy 😉 This human cookbook sure is expanding with recipes by the day. I’m also curious, do you use a program to store all your recipes, pen and paper, or just by memory? I’ve been bookmarking so many recipes that the OCD in me is starting to itch at organizing them somehow.

    Reply
    • Valerie says

      December 16, 2010 at 12:26 am

      Le Quan….
      I store my recipes as I do on my site… Mainly, my site is my first line of reference through the recipe index. It is now alphabetized. YAY.
      I have all my other recipes on my hard drive in folders. Recipes: then many folders like: Appetizers, Soups, Salads, Mains, Desserts… etc (just like a cookbook) and the recipes are stored in each one. I have two sets like this. One set of the tried and true family traditional recipes, and another set that I am gleaning from the posts i read that I want to try. It is my new year’s resolution to try many of those!
      🙂
      Valerie

      Reply
      • lequan says

        December 16, 2010 at 12:03 pm

        Yes, I really need to organize my blog too. But I wouldn’t have that many to organize, that’s partly why I’ve been putting it off…teehee. Thanks for the tips!

        Reply
  7. Heavenly Housewife says

    December 16, 2010 at 1:34 am

    Making your own brioche? How wonderful, how adventurous! Your finished product looks positively lovely and inspires me to want to try it too. First my plan is to really get my regular bread technique down. I am still working on the “Kneading”
    *kisses* HH

    Reply
    • Valerie says

      December 16, 2010 at 1:39 am

      HH – I bought both books: Crust and Dough by Bertinet – before I took the course, and practised the kneading for a year… just by watching his video. He was impressed at the class and I improved immediately with that practice under my belt and his immediate coaching. I was beaming. I love his technique, but it does take a whole lotta practice.
      🙂
      Valerie

      Reply
  8. Faith says

    December 16, 2010 at 4:56 am

    Amazing job on the brioche, Valerie! Thanks so much for sharing your lesson at Le Cordon Bleu with us, the pictures are really helpful. I need to buy brioche tins and when I do, I will be referring back to this post! 🙂

    Reply
  9. Alex says

    December 16, 2010 at 5:20 am

    NICE work! These are beatiful. There’s also the “cheating” method for making brioche heads sit up straigt: Divide the dough for each brioche into two pieces, one large and one small. Form the large one into a “donut” shape and the small into a “tadpole.” Slip the tadpole end into the donut hole and voila! This sounds so graphic. Sorry!
    I’m sure Chef Walters would disapprove 🙂

    Reply
  10. 5 Star Foodie says

    December 16, 2010 at 6:40 am

    Valerie, you brioche rolls look absolutely perfect! Seriously, beautiful and I bet they are so good, brioche is always my favorite. Very cool to make it in Thermomix too, still would love to get my hands on that one day 🙂

    Reply
  11. Magic of Spice says

    December 17, 2010 at 12:45 am

    Your brioche are magnificent…wow!
    And what a wonderful post and tutorial here, excellent 🙂

    Reply
  12. Stella says

    December 17, 2010 at 10:07 am

    Ooh, that’s a lot of work, Valerie, but it looks so worth it. I want one of those with butter right now;)

    Reply
  13. Soon Yean Suan says

    May 14, 2016 at 8:25 am

    Hi Valerie, such beautiful masterpiece and Tq for such great sharing. May I clarify on the step 3&4 Richard bertinet’s recipe, the yeast scaled in for twice?

    Reply
    • Valerie Lugonja says

      May 14, 2016 at 9:38 am

      Thank you for catching that! Yeast should never touch salt so omit the yeast in step 3 and add it in step 4. I will correct the recipe when I get home! 🙂 let me know how it goes!
      Hugs,
      Valerie

      Reply
    • Valerie Lugonja says

      May 15, 2016 at 1:55 am

      I did answer Soon, hope you got the response, but yes – add the yeast in step 4, not 3. 🙂 V

      Reply

Leave a Reply Cancel reply

Your email address will not be published. Required fields are marked *

Recipe Rating


This site uses Akismet to reduce spam. Learn how your comment data is processed.

Search

Thermomix® Independent Consultant; Executive Team Lead Alberta

Weekly Newsletter

Saturday Morning News

Cooking Classes

More Thermomix Recipes etc »

The Best Ever Homemade Tomato Sauce: Healthy and Tasty

More ACF Famous Recipes or Specialties»

Humble White Turnip Soup

Humble White Turnip Soup

More Winter Recipes »

Homemade Hot Cross Buns: Helen McKinney’s Best EVER Recipe

homemade hot cross buns

More Recipes from my mom Helen »

Connect With Me!

  • Bloglovin
  • Email
  • Facebook
  • Instagram
  • LinkedIn
  • Pinterest
  • RSS
  • Twitter
  • YouTube
projects

My Post Archives

Come On In And Kiss the Cook

Educator, Writer, Gardener and Traveler who believes in buying and eating locally, and most importantly cooking at home! [Read More …]

Connect With Me

  • Bloglovin
  • Email
  • Facebook
  • LinkedIn
  • Pinterest
  • RSS
  • Twitter
  • YouTube

Sour Cherry Crisp

More Canadian Recipes »

Lifetime Achievement Award

Canadian Web Blog Award 2013 www.acanadianfoodie.com FIRST

Vote-for-me
Best in Food NEW

acanadianfoodie

🇨🇦Retired Food Blogger! 🍳Food + 🌎Travel Writer, Gramsy 👶🏼! Tried a recipe? 🛎TAG #ACanadianFoodieRecipe 🔻Cook at home!

Instagram post 17964050921151912 Instagram post 17964050921151912
Instagram post 17978645341870880 Instagram post 17978645341870880
Instagram post 17903180924625042 Instagram post 17903180924625042
Instagram post 17973354793611588 Instagram post 17973354793611588
CONGRATULATIONS @cecsparrow for creating this simp CONGRATULATIONS @cecsparrow for creating this simple, DELICIOUS, SUPER FAST and SUPER EASY recipe on the new PINEAPPLE PASSION collection launched just today on Cookidoo!
#pineapplepassion #pineapplepassioncanada 

We love THE ALOHA CARROT CAKE by Cec Sparrow from the CANADIAN PRAIRIES BRANCH launching TODAY in the new Pineapple Passion Collection on Cookidoo

TIP: Using DRAINED tidbits worked for us! (Mom did not use Turbo after adding them)

We’re so proud of you, Cec!
https://cookidoo.thermomix.com/recipes/recipe/en-US/r750328

My 91-year-old mom Helen McKinney made it in her Thermomix. She loves it, too! Vanja Lugonja doesn’t like carrot cake and he loved it! 

https://youtu.be/P8IcVZi0SOU 

#thermomixcanada
Fresh Raspberry Tart Raspberry season is here! T Fresh Raspberry Tart

Raspberry season is here! 
This sumptuous tart first made its debut on my website back in 2010 and has been on our tables every year.

What is your favourite Raspberry recipe?

Find this recipe here at https://www.acanadianfoodie.com/2010/08/11/french-raspberry-tart-with-vanilla-cream/

Subscribe to www.acanadianfoodie.com for this and more recipes!

#raspberry #raspberries #tart #fruittart #frenchtart #dreamdessert #eatdessertfirst #butfirstdessert #berries #yeg #yegfood #thermomix #tm6 #athewiththermomix #madeinmythermomix #acanadianfoodie
Thermomix SEEDLESS Raspberry Ice Cream My grand b Thermomix SEEDLESS Raspberry Ice Cream

My grand babies have their own mini Thermomix®️ and have been more excited using it, however my little Grandson’s only complaint was they did NOT like the seeds. So I went back to my archives for this!

Find this recipe here 

https://www.acanadianfoodie.com/2016/08/05/thermomix-seedless-raspberry-ice-cream/

Subscribe to www.acanadianfoodie.com for more!

#icecream #iscreamyouscreamweallscreamforicecream #raspberry #raspberries #freshfruit #thermomix #thermomixcanada #tm6 #yegfood #dessert #dessertfirst
#thermomixocanada #thermomixocanada
Instagram post 17890716056230877 Instagram post 17890716056230877
𝑺𝒖𝒎𝒎𝒆𝒓 𝑱𝒂𝒎𝒎𝒊𝒏’

My daughter @solosmart.ragan created and shared a FABULOUS recipe her with Momsey!

Once you use the guided recipes, you can use the Thermomix® manually, and soon you find you are able to create your own gorgeous concoctions, just like Ragan did!

We are going to add it to a Brioche Recipe she found on Cookidoo®! Here's her recipe and tag her if you make it. It is DELICIOUS!
Ragan’s Rhubarb and Strawberry Jam

Yield: 2 ½ cups

Ingredients:
500 grams rhubarb, chopped or sliced thickly
300 grams strawberries, cleaned, hulled and quartered
450 grams sugar
1 tablespoon freshly squeezed lemon juice

Materials needed:
Sterile jar
Canning funnel

Instructions:
Place all ingredients into mixing bowl and set time for 30 minutes at Varoma speed 3
Pour into sterilized jar through funnel; seal and refrigerate until ready to use!

#thatsmyjam #jamin #jam #toastandjam #strawberryrhubarb #strawberryrhubarbjam #strawberry #rhubarb #strawberryjam #rhubarbjam #thermomix #athomewiththermomix #madeinmythermomix #madewithmythermomix #yeg yegfood #berry #berryjam #foodie #thatsmyjam #photography #foodphotography #yeg #yegfood
Refreshing through the heat!! We all know summer Refreshing through the heat!! 

We all know summers are the time for Reunions and potlucks! Even in the time of Covid when things possibly are still being postponed! But if you are with your family, here are some delicious fresh recipes to share with your loved ones.

𝐄𝐬𝐬𝐞𝐧𝐭𝐢𝐚𝐥 𝐅𝐫𝐮𝐢𝐭𝐬 𝐟𝐨𝐫 𝐅𝐥𝐚𝐯𝐨𝐮𝐫 𝐚𝐧𝐝 𝐓𝐞𝐱𝐭𝐮𝐫𝐞
-Sliced Fresh Sweet Strawberries
-Diced Sweet Fresh Pineapple
-Whole Green Grapes (or Red Seedless Grapes, but green add visual appeal)
-Cherries (Fresh Pitted or high quality frozen)
-Fresh Firm Sliced Bananas
-Sweet Fresh Diced Watermelon
-Sweet Diced Apples or Peach
(A black fruit if in season (blue berry, blackberry, Saskatoon) for visual appeal, as well)

When was the last time you made a fresh fruit salad for your family or guests? This is our new standard, in the fridge daily, summer treat!

Find this recipe here https://www.acanadianfoodie.com/2016/06/12/fresh-fruit-salad/

Subscribe to www.acanadianfoodie.com for this recipe and more!

#familyreunionfood #familyfood #familiesthateattogetherstaytogether #fruitsalad #freshfruitsalad #seasonalfruit #summerfruit #summersalads
When it’s cold outside… For Vanja it is often When it’s cold outside…

For Vanja it is often his favourite platter of bacon and eggs. This morning, the browned butter and caramelized onion were tossed with the Spaetzle and a little fresh green onion, and oh, my. This was another plate lickin’ lip-smackin’ wonder.

#spatzle #breakfast #lunch #dinner #germanfood #acanadianfoodie
𝑺𝒖𝒎𝒎𝒆𝒓 𝑳𝒐𝒗𝒊𝒏’ 𝑺𝒖𝒎𝒎𝒆𝒓 𝑳𝒐𝒗𝒊𝒏’

Pina Colada Frozen Yogurt

Three simple healthy ingredients create a tart refreshing and satisfying hot summer day treat! 

Want to join me in Hawaii?? Ask me how!! 

Find this recipe at https://www.acanadianfoodie.com/wp-content/uploads/2016/05/1-Pinacolada-Frozen-Yogurt.jpg

𝑾𝒉𝒂𝒕 𝒊𝒔 𝒚𝒐𝒖𝒓 𝒇𝒂𝒗𝒐𝒖𝒓𝒊𝒕𝒆 𝑰𝒄𝒆 𝑪𝒓𝒆𝒂𝒎?

#thermomix #thermomixcanada #thermomixCA #feedyourpassion #acanadianfoodie #solosmart #savvyshopper #fastfoodie #healthynut #gourmetguru #cookidoo #cooklikeachef #cooktoimpress #rhubarb #iscreamforicecream #iscreamyouscreamweallscreamforicecream #icecream #backtobasics #quarentinecuisine #prairies #albertaprairies #familyrecipe #yeg #travelalberta #yegfood #acanadianfoodie @thermomixcanada @canadathermomix @thermomixusa #pinacolada #pineapple #coconut #banana
Picnic for Saturday! ‘My mom’s is better than Picnic for Saturday!

‘My mom’s is better than your moms!’

The quintessential summer salad that reminds me of growing up on the Alberta prairies. This salad says something had arrived, but most importantly, it says family.

Salad 
-4 eggs, hard “boiled”
-5 pounds of potatoes, or so (2.3K)
-one bunch of small radishes, and if you pick them from your garden, one bunch
-one small bunch of chives
-2-3 stalks of celery
1 small onion

Dressing
-200g homemade mayonnaise
-20g Dijon mustard
-10g salt, or to taste
-5g pepper, or to taste (I like lots)

Find this recipe here https://www.acanadianfoodie.com/2013/06/07/the-canadian-food-experience-project-potato-salad/ 

Subscribe to www.acanadianfoodie.com for this recipe and more!

#familyreunionfood #familyfood #familiesthateattogetherstaytogether #potatosalad  #potatoes #seasonalsalad #traditionalsalad #summersalads
Soup for dinner! Summer Dinners are the perfect t Soup for dinner!

Summer Dinners are the perfect time to test out my creation of this homemade preserved Asparagus Soup Concentrate on the family and it was a slam dunk! It is not a fresh asparagus soup. It is a concentrate, re-constituted with added ingredients that enables a seemingly fresh homemade soup later in the year with little effort. The finished soup is a delicate blend of flavours with a more subtle asparagus note than a fresh asparagus soup would present, yet renders a compelling appeal that consistency evokes that same strong pleasurable response.

Find this recipe here at https://www.acanadianfoodie.com/2016/06/14/preserved-asparagus-soup-concentrate/ 

#acanadianfoodie #asparagus #soup #soupdejour #soupoftheday #soupson #yeg #yegfood
A Healthy dose of fresh! What better way to start A Healthy dose of fresh!

What better way to start your Sunday, than with a delicious toast with healthy homemade HOMEMADE Almond Milk!

The dry pulp is delicious. If you don’t mind the texture, leave it in. Many do. The above pulp is creamy and delicious. Throw it into another recipe. Don’t waste it! It is almonds and rice. Absolutely delicious. Me? I ate a little ball of it every day til it was gone. Yummy. And the Homemade Almond Milk.

#thermomixedmonton #ThermomixCanada #yegfood #healthyeats #whatsinyourfood 
#acanadianfoodie #solosmart.ragan 
#homemadealmondmilk #almondmilk #thermomixalmondmilk
Salted Caramel Ice Cream The addition of the crun Salted Caramel Ice Cream

The addition of the crunchy hand-mined fleur de sel on the top elevates the taste over the top of any salted caramel ice cream bar! As well as the silken creamy texture, it held the freeze well. The addition of the salted caramel sauce was too decadent for words. No need for words when savoring this luxurious, velvet-sweet-salty-sumptuous reprieve amid a hot summer day. M-m-m-m-m…

Find this recipe here: https://www.acanadianfoodie.com/2012/07/11/salted-caramel-ice-cream/ 

subscribe to www.acanadianfoodie.com for this recipe and more!

How will you beating the heat this summer? Or enjoy it?

#icecream #iscreamyouscreamweallscreamforicecream #thermomix #hotdays #summervibes #saltedcaramel #beattheheat #sweetandsalty  #acanadianfoodie #yeg #yegfood #madewithmythermomix #memories
𝐄𝐯𝐞𝐫𝐲𝐭𝐡𝐢𝐧𝐠’𝐬 𝐜𝐨𝐦𝐢𝐧𝐠 𝐮𝐩 𝐑𝐡𝐮𝐛𝐚𝐫𝐛!

Few things say prairies like rhubarb and this ice cream will no doubt be a favourite in the spring and summer heat! Long weekend here we come!

Find this recipe here at  https://www.acanadianfoodie.com/2012/07/18/the-best-rhubarb-ice-cream-ever/

Subscribe to www.acanadianfoodie.com for this recipe and more!

#thermomix #thermomixcanada #thermomixCA #feedyourpassion #acanadianfoodie #solosmart #savvyshopper #fastfoodie #healthynut #gourmetguru #cookidoo #cooklikeachef #cooktoimpress #rhubarb #iscreamforicecream #iscreamyouscreamweallscreamforicecream #icecream #backtobasics #quarentinecuisine #prairies #albertaprairies #familyrecipe #yeg #travelalberta #yegfood #acanadianfoodie @thermomixcanada @thermomixusa
Japanese Cheesecake! Thank you @kidsleadingkids f Japanese Cheesecake!

Thank you @kidsleadingkids for your class on this delicate cheesecake! So light and airy with a cotton texture. 

I learned so much and really enjoyed all the tips from you Linda!

What is something you have always wanted to make but when you did, it did not turn out?

#japanesecheesecake #cheesecake #madeinmythermomix #thermomix #dessert #eatdessertfirst #yeg #yegfood
Keto Strawberry Panna Cotta Everyone will love th Keto Strawberry Panna Cotta

Everyone will love this sweet little ditty but it is especially great as a celebration of Spring or Summer!

Finding new ways to bring sweetness into our lives! Tomorrow- Sunday supper will be complete!

#keto #strawberry #pannacotta #sugarfree #acanadianfoodie #eatdessertfirst #sweetendings #acanadianfoodie
Follow on Instagram

Copyright © 2025 · Website by PoundPig