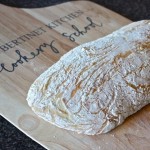
Ultimate Crunchy Crust with White Fluffy Puffy Interior

Par-bake it, wrap it, and freeze it: 12 minutes at 400°F = Bread Heaven!
Richard Bertinet is an incredible Baker. He is a passionate and tenacious teacher. I am working to challenge myself to get through all of the bread recipes I have on my “to make” list after attending his Cookery School in Bath UK last March. Ciabatta bread was first on the list after my basic white bread. He uses the French technique to work the dough… not the “traditional British method of kneading with flour everywhere” that we have all been taught in North America.

In any case, I wanted to get into Sour Dough breads, and this ciabatta bread is a very good place to start, as this bread uses a very simple recipe for the ferment and is relatively easy to make with exceptional results. It absolutely elevated the Smoky Chili Soup I served it with earlier in the week, and as I have several now, par baked, it is a treat to take one out of the oven, throw a few ice cubes in it with the bread, and the crunchy crust is unbelievable with the puffy pillowy interior. Really a lovely rustic “pull apart” and “dunking into yummy things” bread…. and in just 12 minutes at 400°F from frozen! That is spectacular, no?

Look at that yeasty goodness!

Ciabatta Bread: What is it really?
You can identify ciabatta by its shape which is that of a worn or flattened slipper: “ciabatta” literally means “slipper”. The bread features a crisp crust surrounding an interior that has a soft texture and an open crumb with a flavour that is slightly sweet/sour. It requires the preparation of a starter which must be allowed to rise overnight. The remaining ingredients are then mixed with the starter and allowed to rise for several more hours. The bread has a high liquid content that makes the dough difficult to manage, but is necessary to achieve the correct results.
Ciabatta Bread: The Starter
This is how the starter looks that is required to make the ciabatta bread after it has rested 24 hours.

Ciabatta Bread: Making the Dough
I confess, I used my Thermomix to knead the dough as I have one and it is perfect for this. But, I did one batch by hand, too. I always do that first to ensure I know where I am going with the dough, what it feels like, and what it “should’ feel like when it is ready to proof. You can see, in the third photo below, the high moisture content in the ciabatta bread dough. And below that, after it had proofed for the required amount of time, the texture of the ciabatta bread dough again.


Out onto a very floury counter it goes which is very different that most of the other bread recipes I work with. Then, the top of this dough is also generously sprinkled with flour.
Ciabatta Bread: Shaping the Dough or Making the Slipper


It is carefully stretched out into a rectangle, then cut into four (more of less) even pieces.


Working with one piece, one end is folded over the strip one third of the way, and the other side is folded back over it. Pinch the edges together to seal, then starting at the top, using your fingers, push into the dough all they way down to work out any air bubbles.


Take that piece of dough and now fold it in half and lay it on a well floured cloth to proof again.


When I preheat my oven to 475°F, I place a jelly roll pan upside down on a rack to slide my bread onto so that the bottom crust can get as crusty as possible. Gently pull each end of the bread when placing it on the paddle to shift into the hot oven. Don’t forget to turn the oven down to 435°F right after you slide the bread into it! I have 3-5 ice cubes ready to throw into the bottom of the hot oven at the same time as I slide it in as that steam will delay the crust forming on the bread and enable it to be much crunchier.
Ciabatta Bread: Baking the Dough


Ciabatta Bread: The Interior
I was so delighted! With this loaf, and with the ones I par-baked and froze. Vanja is a European man and cannot eat a meal without bread. Paninis with this ciabatta bread are a favourite of his.

Ciabatta Bread: Richard Bertinet's Recipe
After attending Richard Bertinet's Bread Making Class in Bath, UK, I was hooked. This is a brilliant and rather easy recipe. Best part: par baked loaves that are outstanding when baked later!
Ingredients
Ingredients for the Ferment (to be prepared 24 hours in advance):
- 350 g or 12 1/2 ounces or 2 2/3 cup white bread flour
- 190 g or 7 fluid ounces water
- 2.5 g or 1/2 teaspoon fresh yeast
Ingredients for the Dough:
- 450 g or one pound Italian bread flour (I used unbleached white)
- 20 g or 1/3 ounce fresh yeast (same measurement for dry, but not instant)
- 340 g or 13 fluid ounces water
- 75 g or 5 tablespoons olive or avocado oil
- 1 tablespoon good quality fine grain salt
- oil for oiling
- flour for dusting
Instructions
Instructions for the Ferment:
- Mix all ingredients together in a mixer, or by hand, for about 5 minutes until you have a rough dough
- Place in bowl covered loosely with plastic wrap and a lint free dishtowel
- Rest in a draft free place 17 - 24 hours
Instructions for making the dough:
- Put flour in a mixing bowl; rub in yeast with finger tips as if you were making a crumble
- Scoop the ferment into the bowl; add water, oil, and salt, mixing well until combined
- Transfer to counter work surface with the help of the rounder end of your scraper or "D-shaped" bread making spatula
- Work the dough as demonstrated in the Sweet Dough video, below
- Mold dough into a ball; lightly oil a bowl with EVOO or avocado oil and place back in cleaned bowl, covered with a lint free towel
- Rest in warm place for 90 minutes, or until bubbly and light
- Flour work surface generously with white flour or cornmeal; with the help of the rounded end of your scraper, turn dough out onto counter in one piece
- Flour the top; press dough lightly and gently, dimpling it gently with your fingers
- Divide into four equal strips; fold each strip into three: fold one part of one strip over the middle third of the dough gently pressing to seal; bring the other side back over that middle third gently pressing to seal
- Finally, fold in half lengthwise, and seal edges
- Preheat oven to 475°F with cookie sheet or upside down jelly roll pan on oven rack to be heated to bake bread on
- Place pieces of dough onto well floured lint free dishtowels; cover and proof for 45 minutes
- Flour a wooden peel; pick up one ciabatta at a time, turn it over and stretch it lengthwise a little at the same time, and lay it on the peel
- Spray inside of oven with water, or throw 5-6 ice cubes in bottom of oven; quickly slide ciabatta dough onto "baking stone" tray
- Turn oven down to 435°F and set timer for 20 minutes: if you are par-baking the bread, set the timer for 15 minutes, cool loaves completely, wrap well, and freeze (Bake from frozen for 12 minutes at 400°F)
Instructions for making the dough in the Thermomix:
- Scale the flour and yeast into the TM bowl, and combine for 10 second at speed 4
- Add the ferment; scale in the water, oil, and salt and mix to combine for 30 second at speed 4-5
- Knead for 3 minutes; follow the instructions above from #5 onward
Notes
![]()
![]()
![]()
![]() Subscribe to A Canadian Foodie so you don’t miss a post! (top right
Subscribe to A Canadian Foodie so you don’t miss a post! (top right


I am just getting into bread making since being scarred by a hard loaf at the age of 10, yes it took me over 20 years…this looks beautiful and easy. On the other hand my sister from Australia came to visit this Jan and went for some Niagara Tour from Toronto to the falls and hated it, I guess they stoped at Dan Akroyds winery in the dead of winter… I am sure this one will be much much much better, I am sure it can not be worst
Polwig…
I am not sure I understand your point.
Valerie
Excellent tutorial you’ve put together as usual Valerie. I love the taste of Ciabotta but haven’t actually made it, but think I’ll rectify that with these great instructions. Thanks for sharing 🙂
Valerie…what a wonderful post and tutorial on the art of breadmaking. I loved looking at all of your step by step photographs. You made me want to abandon my Saturday plans and make bread instead! Thank you for sharing, dear friend. I hope you have a happy Saturday. Hugs and love!
Valerie,
Honestly, after your bread making lesson, I don’t know if I would want to buy a bread maker. I found the kneading part so much fun! That’s partly why I really want to make that olive oil flatbread again. You really have inspired me to make and learn more about bread making. I finally understand why people are in love with bread making. Ok, so is there a difference in dry yeast and the yeast we used (the playdough like yeast)? When shopping, I went to two places before I found the playdough yeast. Every place had the dry yeast though. Do you buy most of your baking stuff at Superstore? Thanks so much again for the fantastic lesson. I really had a great time and learned a lot!
PS
Needless to say, this bread looks wonderful. Crunchy on the outside and fluffy on the inside. You are so inspirational.
Absolutely beautiful, wonderful airy texture. I am so shameful not to have gotten the bread thing started. Daaahling, you need to kick my arse a bit!
Can you give me a little more info on par baking bread? Here in England we get those “half baked” breads at the supermarket, and they are wonderful. At home, how would we know when its time to put it in the freezer?
Wishing you a wonderful weekend.
*kisses* HH
HH:
It is all in the instructions – and in his black book titled : Dough, if you bought that one. You bake each loaf you want to freeze for only 15 minutes, instead of 25, cool completely, wrap well in plastic wrap and freeze for up to three months (it never lasts that long). I bake one full tilt, and par-bake the other three. The, take one from the freeze, completely frozen once the oven has heated to 400F and bake it for 12 minutes! It is beautiful and exactly like fresh baked. I am in heaven over this. You can do the same thing with other loaves, he was telling us in the class. But, I have never had enough to freeze until making this one. I am so charmed by it and have a raging and ongoing ferment now in the fridge that just gets better with age!
🙂
Valerie
Thanks very much for dropping by my blog. You have such a lovely blog. I’m intrigued by this ciabatta bread….that gooey dough that turns out into a fabulous loaf 🙂 I would love to do some bread baking this year. My daughter has been asking. Thanks for the inspiration. Hope you have a lovely weekend.
Great looking bread. I’m an avid bread maker and going to have to try this. What really appeals is the ability to part bake and freeze. Ideal to have in the freezer for those days where you want great bread and haven’t prepared in advance.
Now of to check out bread courses in Bath . . .
Edward!
Where do you live int he UK!
You absolutely MUST attend Richard’s bread baking day. There is a class he offers where he is the teacher and that is the one to take. I bought both books first, read them and watched the videos. practised and that made the class so much more valuable. I cannot recommend the experience highly enough! He is passionate, personable, real, and engaging.
Now I get to check out YOUR site!
🙂
valerie
I love the texture and all the nooks and crannies of ciabbata bread Valerie. Up until now I have always purchased it at the Artisnaq Bread Co., although even Sane On Foods makes a good one.
You make it sound so easy, Valerie. Definitely worth a try. Btw, I love the cutting board!!!
Hello Valerie. What an amazing tutorial for this bread. My boyfriend loves ciabatta and he would be thrilled if I prepared a homemade loaf for him. I love that you can par-bake and freeze these. Thank for this wonderful recipe!
Magda
Thank you for sharing this wonderful post.I would love to try and make this.You’re good!
This is my favorite Italian bread and what happens is that when I have one nearby I cannot leave it alone and end up eating the entire loaf! Now I know where to turn to when I need my fix! Valerie, you are amazing, just unstoppable!
joumana, the beauty of the ciabotta in this recipe, is that each loaf is not so heavy… so it is not too hard for a family to eat one in a day….so, you needn’t worry about getting into the leftovers!
🙂
Valerie
What a beautiful loaf of ciabatta, Valerie! I love the texture and the fact that it can be par-baked and frozen. I also watched the video and would love to try that sweet bread too! I need to get back into bread baking, it’s been too long.
How cool that you were able to take his class! I would love listening to that voice 🙂
Susan!
I have made the sweet dough, too – and the brioche – and so many of his breads. I have to get posting them! He is fun to listen to… isn’t he? (Grin) And, when you meet him, all that charm is still there, plus such a genuine warmth that I did not expect. Absolutely a great guy!
🙂
Valerie
What a gorgeous dough and crumb. Love all the pictures of the dough!
From crust to crumb that is one gorgeous loaf of bread. Your post is really wonderful and simplifies bread baking for those of your readers new to baking bread. I hope you have a wonderful day. Blessings…Mary
Wow is this similar to the ‘pain a l’ancienne’ recipe I’ve been enjoying. Same wet dough, same handling of said wet dough, same cutting, etc. It indeed is counter intuitive when you’re used to kneading flour-y doughs! The freezing bit is awesome – I’ll have to give that a go.
I should definitely par-bake more bread. It would make it so much easier to just heat it and serve.
An excellent artisan loaf with perfect crumb and crust! And thank you for the instructions together with pictures, that make the artisan baking seem so fun and easy!
Love, love, love, love, love. My daughters heart Ciabatta and I said this was next on my list to make. I’m glad I have a great set of recipes and instructions to follow.Stay well.
Ciabatta is one of my favorite breads but I am always a bit scared to make it because I’ve had some really good ciabatta in my life and I’d be so sad if it didn’t turn out well. Your texture in these is absolutely perfect. Love those big holes!
Your ciabatta is a real masterpiece, Valerie!! I’m tempted to go into the kitchen right now and try to recreate that magic. 😉 I bet it was the perfect accompaniment to the chili!
That is a beautiful loaf Valerie! I had no idea (until LeQuan clued me in) that you were a bread baker! The crust and crumb are gorgeous! That ice cube trick really works marvels but I have to admit I’m pretty lazy about the ice cubes, spray bottles and oven tiles LOL Looking at your ciabatta is making me think maybe I should make the extra effort….
I so wish that I could have taken the class! Your bread looks absolutely beautiful
Excellent tutorial Valerie.Such a learning experience of bread making.Kudos for making such a beautiful bread.I so wish I lived near by you.
we love ciabatta and usually buy it at our local bread store,but your inspring me to try this at home..thanks for adding the vid..
sweetlife
This bread looks absolutely sensational. I would love a piece of this with some good olive oil right now!
Hi Valerie. I am familiar with traditional dry active yeast and with instant(bread machine) yeast. I am not familiar with fresh yeast. Any idea how to convert fresh yeast quantities to instant yeast? If not, where do you find fresh yeast? Do you see it in grocery stores on the prairies?
HI, Bill!
I have found that the quantities are the same and all recipes I have used are interchangeable. That being said, in the end, and over time, particularly with a sourdough bread or a bigga (poolish) starter, fresh yeast will bring about the best tasting notes and the nicest crumb in your breads. In Edmonton, the Italian Centre Shops sell it by the pound, but truly, you can go into any bakery and ask to buy some. I haven’t heard of one that will not sell their fresh yeast over the counter, yet. It also freezes, but best to freeze it in smaller portions.
🙂
Valerie
Hi, I love the look of the ciabatta. I first had a sandwich made with one in Ballina, Mayo years ago, and still recall how wonderful it was! I have an active, energetic sourdough starter that I use all the time. Can I use that in place of the ferment? If so how much should I use? Thanks for the inspiration. Shea
Hi, Shea!
Take a look at the size of the starter in this recipe. It is considerable, really. Then add the grams and that is how big your starter would need to be – and YES you can use it. For sure. It will taste differently as no two breads taste the same when made with starters as the air and environment affect the specific nature of each starter, but you would build a wonderful ciabatta!
🙂
Valerie
I don’t think I follow point number 8 on your bread instructions. Once you have four strips, how do you then create 3? Is there a video of the process that I can watch? Am very keen to try this!
Hi, Mike
You FOLD each of the strips in three or in thirds – see the photos – the photos match the instructions. Let me know if that helps…
🙂
Valerie
The recipe calls for 20g or 1/3 oz of yeast.
Which is it? Since one oz = ~28 grams then 20 grams =.7 oz, not .33 oz.
Hope to hear back really soon as I making this tomorrow!
And let me add a sincere THANK YOU for all your efforts on this site.
Thank you, Forepaughs, for pointing this out!
It is 20 grams!
I would love to hear how it goes!
Thank you!
Valerie
Valerie:
I only just started baking ~3 weeks ago and have made Italian, Braided Sweet Bread and now this Ciabatta. For this recipe I used ~.33 ounces of Active Dry Yeast and I heated the water to 90F degrees. The result was totally delicious and gorgeous looking with some large pockets.
BUT the Best Kept Secret you shared was on how to par bake the loaves and then freeze them for almost instant enjoyment later. We served a frozen loaf at dinner and the 4 of us ate an entire loaf despite the fact that we enjoyed a 6 course meal!
Again, thank you so much for the par bake technique. We call it the Valerie Method.
Forepaughs!
What a lovely tale! We love that method, too. It is wonderful to have a couple of par-baked loaves in the freezer for company, but I must confess, Richard Bertinet mentioned to me that I could do that when I intended his class. I do like the “Valerie Method”, though. 😛
V
Hi, Neat post. There is an issue along with your web
site in web explorer, would check this? IE nonetheless is the market chief and a huge section of
people will omit your wonderful writing because of this
problem.
Thank you so much got letting me know! I pay my support big bucks so this kind of thing does not happen!
🙂 Will look into it!
Cheers,
Valerie
Found this recipe on Pinterest! And it looks divine. Will be trying it in Texas soon. Thank you for the guidance on “par baking”. I knew it was possible but didn’t know what to call it or how to accomplish it. As the working mom of three, any soirt cuts I can find to keep my family healthy, happy and eating real food are really appreciated.
Courtney,
Really appreciate your comment as most read and don’t leave a bit of advice, a reflection or what they found helpful from a post… and that means a lot. It is Richard Bertinet that is the hero on the par baking point… I also love this recipe – I hope you also stop by my pinterest board, and visit my site for other family recipe helps!
🙂
Valerie
I have Bertinet’s “Crust” published 2007 + the quantities differ from the ones here e.g. ferment 180g water instead of 190g water + 2g yeast instead of 2.5g yeast + for the ciabatta 10g fresh yeast instead of 20g fresh yeast, 50g olive oil instead of 75g olive oil. Has he changed his recipe or have you modified it intentionally by increasing certain quantities?
You know, I do not recall, but this is the recipe I use, and you can see by all of the comments, that it is fabulous.
🙂
Valerie
I will add, that I do believe this was the recipe givento us in the class the day I took the course, which is clearly different than the one you are referring to in his published version…
Great recipe. If I use instant , what would the ratio be please ?
The same, Nicolas. Let me know how it goes!
🙂
Valerie
Hmm it looks like your blog ate my first comment (it was extremely long) so
I guess I’ll just sum it up what I submitted and say,
I’m thoroughly enjoying your blog. I as well am an aspiring
blog writer but I’m still new to the whole thing. Do you
have any tips and hints for beginner blog writers? I’d genuinely appreciate it.
Hi Jacyln
Thanks – but I really don’t have that kind of time…. there are so many videos, tutorials and people better than I to assist.
Hugs
Valerie