• Home
  • About
    • Privacy Policy
    • Work with Me
    • Media Kit
    • Evolv Health: Valerie’s Story
    • Personal Stories
    • Press
    • Year in Review
  • Thermomix® Independent Consultant
    • Thermomix® Independent Consultant
    • Client Testimonials
    • Recipes Developed by Valerie
  • Projects
    • Cheesepalooza
      • Cheesepalooza Challenges
      • Cheesepalooza Participants
      • Preparation for Cheesepalooza!
      • Basic Ingredient and Supply List
      • Ingredient and Matierial Suppliers
    • Dueling Daughters Project 2014
    • Eat Alberta
    • Gramsy Glimpses
      • Gramsy Glimpses Vignettes
    • Project 2019: Valerie’s Personal Evolv Health Story
    • Project 2017: Cooking in the Kitchen With….
      • Completed Project 2017 Posts: Cooking in the Kitchen With….
      • Project 2017: Cooking in the Kitchen With… PARTICIPATE
      • Project 2017: Cooking in the Kitchen with….Schedule
    • Slow Food Edmonton Tastings
      • Participate!
    • The Canadian Food Experience Project
      • Participate!
      • Participants
      • Challenges and Round Ups
      • Canadian Food Heroes Series
  • Events
    • Baby Shower
    • Food Blogger Meetings
    • Promotions
    • Restaurant Reviews
    • Reviews (Products, Books, and Events)
  • Philosophy
    • In a Nutshell
    • Local Produce/Producers
    • Slow Food
    • Teaching
  • Travel
    • Bosnia
    • British Columbia
    • California
    • Croatia
    • Culinary Tourism
    • Farmer’s Markets
    • France
    • Greece
    • Hawaii
    • Italy
    • Louisiana
    • Maritime Provinces
    • Massachusetts
    • Mexico
    • Montenegro
    • Nova Scotia
    • Prince Edward Island
    • Quebec
    • Serbia
    • United Kingdom
    • Utah
  • Trends
  • Store
  • Privacy Policy
  • Privacy Policy for A Canadian Foodie
  • Valerie’s Image

A Canadian Foodie

Canadian Food Recipes; Preserving Canadian Food Practices

  • A La Carte
    • Appetizers
    • Drinks
    • Evolv Health Reboot Recipes
      • Reboot Phase 1 Mains
    • Garnishes
    • Salads
    • Sauces Dressings Rubs
    • Sides
    • Soups and Stocks
  • Breakfast & Brunch
  • Cheese
    • Blue/Stinky
    • Firm
    • Fresh
    • Hard/Pressed
    • Cheesepalooza Challenge
    • Cheesepalooza Round Up
  • Desserts
    • Cakes
    • Cookies, Bars and Squares
      • Christmas Cookies
    • Ice Cream, Sorbets and Frozen Yogurt
    • Icings/Frosting and Pastry Creams
    • Other
    • Pies and Tarts
    • Puddings
    • Sweets and Treats
  • Doughs and Crusts
    • Biscuits
    • Bread Buns and Flatbread
    • Crackers
    • Donuts, Frybreads and Such
    • Dumplings etc
    • Pasta
    • Pastry
  • Mains
    • Beef
    • Casseroles
    • Chicken/Duck/Goose/Turkey
    • Marinades and Rubs
    • Pasta Dishes
    • Pork
    • Potluck
    • Savory Pies Pastries
    • Seafood and Fish
    • Stews
    • Vegetarian
    • Veal
    • Wild Game
    • Wraps Pizzas Casual Food
  • Seasonal
    • Autumn
    • Spring
    • Summer
    • Winter
    • Holiday
      • Christmas
  • Gardens
    • Foraging
    • My Garden and From My Garden
    • Preserves
    • Zone Three Harvest
  • Tastings
  • Kids
  • Canadian Food
    • Atlantic Provinces
    • Canadian Aboriginal Food
    • Canadian Berries
    • Canadian Cakes
    • Canadian Doughs
    • Canadian Drinks
    • Canadian Fish
    • Canadian Food Heroes
    • Canadian Food Main
    • Desserts
    • Grandma Maude’s Family Recipes
    • Mom Helen’s Famous Family Recipes
    • Canadian Products
    • Sunday Suppers
    • Wild Food

Homemade Yogurt, Yogurt Cheese, Marinated Yogurt Cheese Balls

February 16, 2009 by Valerie Lugonja 36 Comments

Homemade yogurt is easy-peasy, and these cheese balls are YUMMERS!

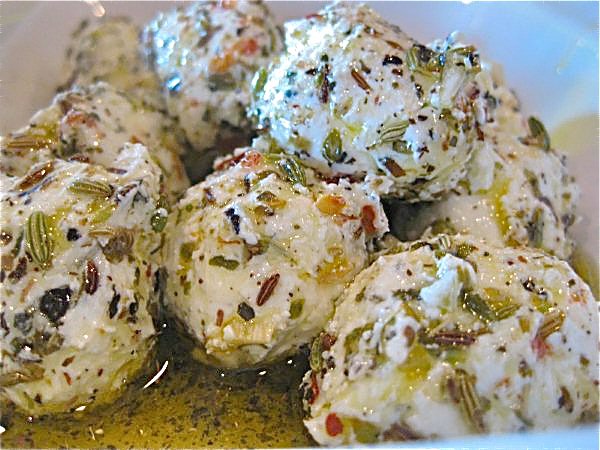
Do these not look DE-LUX-I-O-ISHES? I was inspired to create this recipe after tasting a cheese dip at one of the booths at the  Old Strathcona Farmer’s Market. I am pleased with this flavour combination, but this is the kind of dish that begs you to play with other flavour combinations. They are wonderful spread on a cracker or on toast – luscious, creamy, and bursting with flavour.

Homemade Yogurt
The first time I ate yogurt I was in 1969. I was 14, shortly after it was introduced to the western Canadian markets. It was a foreign food at that time. Can you imagine that? Now, we were all hooked! That is what I love about Canadian multiculturalism. I don’t have to travel the world to learn how to cook an international dish. I just have to run next door! Plain or natural yogurt didn’t hit the mainstream marketplace until much later, but we eat nothing else due to the nutritional value of it.
Print

Homemade Yogurt


Course Dairy
Cuisine Canadian
Prep Time 5 minutes
Cook Time 40 minutes
Total Time 45 minutes
Servings 2 litres
Author Valerie Lugonja

Ingredients

  • 2 litres of whole milk (or 2 quarts)
  • 60 grams of natural , plain yogurt* (or 1/4 cup)
  • *the ingredients on the side of the plain yogurt you choose to purchase must read only yogurt culture and milk solids; there must be no artificial ingredients , chemicals, or gelatine

Instructions

  1. Place the milk in the TM bowl; cook at 80 degrees Celsius 20 minutes at speed 2-3
  2. Cool milk in the TM bowl to 37 degrees Celsius (take lid off); set your timer and check back every 15 minutes, or cool in the fridge and set timer for 20 minutes (do not let the milk cool to room temperature or below 37 degrees Celsius)
  3. Add yogurt culture to the warm milk; combine for 5 seconds at level 1-7
  4. Heat mixture at 37 degrees for 20 minutes at level 2-3
  5. Pour into ThermoServer, cover; set on counter for 5 hours
  6. Place in refrigerator overnight; yogurt will thicken overnight and be ready to serve

Recipe Notes

Remember to retain enough of this yogurt for your next starter.

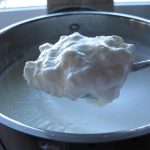
Measure the milk into the Thermomix bowl, and turn it on: time temperature (in Celsius), and speed.

Cool the “cooked” milk in the fridge with the lid off until 37ºC, and then add the yogurt culture (plain yogurt).

And, again: time, temperature, and speed. Done to foam perfection.

Pour the yogurt into a thermal bowl, cover, and leave on the counter for 5 hours. Then refrigerate.

You will find a creamy, glossy, thick white yogurt ready to mix into your homemade granola for a nutritious, delicious, and healthy breakfast!

Print

Yogurt Cheese

Course Dairy
Cuisine Canadian
Author Valerie Lugonja

Ingredients

  • One batch of homemade yogurt made from 2L whole milk

Instructions

  1. Place the tea towel, or cloth into the straining basket or onto the Varoma steaming tray
  2. Pour all of the refrigerated yogurt into the straining basket or onto the Varoma steaming tray, ensuring all goes inside of the cloth
  3. Set the straining basket or onto the Varoma steaming tray into a larger bowl, or over the sink, to drip into, ensuring that the basket or tray is well above the dripping area
  4. Leave this over night, or for 8-10 hours; replacing the cloth and turning on the straining tray about 6 times during this process to enable a firmer, and creamier final product
  5. When the cheese peels or falls away from the cloth easily, it is done!

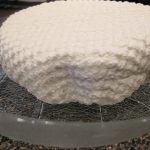
The batch below is just ready to be taken out of the basket. I have removed it from the sink grate and am just admiring the texture of it. It is sitting in a dishcloth I used at the end of the process. There is far too much volume at the beginning, and a tea towel, or a larger piece of fabric is essential at the onset.

Take a closer look. I even love the little texture bumps that the fabric impressed into the cheese.
Isn’t it beautiful?

And here it is turned out onto a plate. I am absolutely thrilled every time I make this. It is time consuming, but so simple, and there is so much that can be made with it! It is so delicious and healthy and the satisfaction I feel when turning it onto the plate is as if I actually raised the cow, and milked her myself. Yes, the depth of my satisfaction is palpable, and a true testament to the intimate connection I have with preparing food with my hands for my family and those I love. As most of us are no longer in the position to produce our own food on the farm, there is so much more we can do, similar to this, to be an integral part of the food production process.

Print

Marinated Yogurt Cheese Balls


Course Appetizer
Cuisine Canadian
Prep Time 30 minutes
Total Time 30 minutes
Servings 33
Author Valerie Lugonja

Ingredients

  • one batch of yogurt cheese made from 2 L whole milk
  • 1/2 c of fruity extra virgin olive oil
  • 3 large cloves garlic , finely minced
  • 1 tablespoon dried oregano
  • 1 tablespoon dried basil
  • 1 1/2 teaspoon fennel seeds
  • 1 1/2 teaspoon caraway seeds
  • 3/4 teaspoon dried hot pepper flakes (to taste)
  • 3/4 teaspoon cumin seeds
  • 1 tablespoon Maldon Sea Salt
  • more than a good few turns of fresh ground black pepper

Instructions

  1. Using a melon ball scoop, or a mini-ice cream scooper, form small balls; place them into a small container
  2. Drizzle balls with fruity extra virgin olive oil to be sure they don't stick to one another; continue drizzling as you add layers
  3. Once all balls are made; combine remaining ingredients into second container of similar size
  4. Slowly "roll" balls from one container to the other a few times to mix ingredients around them OR roll balls in spice mix and then preserve in oil; taste is similar, appearance is dramatically different
  5. Serve with crackers
  6. Will keep fully submerged in oil for a couple of months; almost forever, if balls are plain.

Recipe Notes

Do this according to your own palate. I have made this many times and usually to this standard.

These should keep at least a couple of weeks in a refrigerator. I find that my yogurt cheese keeps much longer than my homemade yogurt, so this should keep about three weeks, properly sealed.

See these delectable little cheesy balls? They seemingly quiet, and unassuming, yet, they can be absolutely dynamic and pack a huge punch with properly seasoned.

I could not resist getting a close up of the texture of this yogurt cheese. Is it not absolutely gorgeous: dense and creamy?

And here we are again, back to the final product. Something to smile about in a quiet moment, in a quiet corner, savoring a bit spread on a small cracker… that little sideways grin starting to pull at the corner of my mouth. Does it get any better than this?

Now, to view this experience on video, check out how I did it in “real time” here.

If you make these, let me know how it goes!

Tweet3
Pin148
Share
151 Shares

Filed Under: Appetizers, Fresh, Thermomix® Cheese Tagged With: Dips and Spreads, Thermomix, Yogurt

About Valerie Lugonja

Like what you see? SUBSCRIBE TO A CANADIAN FOODIE
Educator, Writer, Gardener and Traveler who believes in buying and eating locally, and most importantly cooking at home! As a brand new Gramsy, so be prepared to hear a lot about this new role in her life!
Please connect with Valerie to buy a Thermomix Machine!

« Girls Just Wanna Have Fun!
Homemade Granola: My Canadian Alberta Prairie in a Bowl »

You might also enjoy...

Gooey Hot Chocolate Cookies
Gooey Hot Chocolate Cookies: Ragan Rodgers’ Cookidoo Recipe
Gummy Bears
Gummy Bears Recipe: Gummy Candy is SO make with Thermomix!
Cooking with VALZA: Virtual Thermomix® Cooking Opportunity
Thermomix® TM6™ and TM5™
Thermomix® TM6™ and TM5™: Valentine’s 2020 TEN DAY Promotion
Autumn Apples with Latin Foods Queso Fresco

Comments

  1. Aran says

    February 26, 2009 at 7:21 pm

    Thanks for your comment! It made me smile… Macarons take practice because it’s not about the recipe as it is about technique and knowing your ingredients and oven. Keep on trying. I love Alberta! My husband’s family is from Montana and we have visited Canada several times. Breathtaking!

    Reply
  2. Mary Kelly says

    August 17, 2011 at 5:00 pm

    Thank you Valerie. I have been using a lactose free milk so will have a try with that.

    Reply
  3. lila says

    March 26, 2012 at 8:18 pm

    Hi Mary Kelly & Valerie,

    I believe if you leave the yoghurt/cheese to ferment for much longer – between 20 and 24 hours, that gives the bacteria a chance to really build and they then break down the lactose and it’s much better for the gut …
    I was listening to Dr. Allison Siebecker talking about it here: http://www.blogtalkradio.com/undergroundwellness/2012/03/15/ask-the-digestion-doc-with-dr-allison-siebecker
    It takes quite a few minutes to get to her – so be prepared!
    Hope that helps, Im going to try mine tonight …

    Reply
    • Valerie says

      March 27, 2012 at 7:08 am

      Excellent resource, Lila!
      Thank you!
      🙂
      Valerie

      Reply
  4. Melanie says

    January 13, 2015 at 2:07 pm

    Hey Valerie,

    I am making some yogurt right now with this recipe and can’t wait to try it! If we were to make a flavoured yogurt, say with frozen or fresh fruit/honey etc when and how would we add it into the mix?

    Also, do you have a recipe for coconut yogurt? Would love to make a lactose free version.

    Mel 🙂

    Reply
    • Joanna says

      June 25, 2015 at 8:38 pm

      Hi Mel!
      I just came across this site. I do my fruits after the yogurt is done. I put the yogurt into 250ml canning jars 3/4 full and add berries fresh or frozen on top, and refrigerate. I have 12 jars, usually the yogurt is gone by the end of the week, so it keeps at least for a week… 😉

      Reply
      • Valerie Lugonja says

        June 26, 2015 at 1:37 am

        Great idea!
        Thanks for chiming in, Joanna!
        Sincerely,
        Valerie

        Reply
  5. MCHH says

    September 12, 2021 at 1:25 pm

    What is a “TM bowl” And what is a “thermomix machine” (just figured out that TM stands for thermomix, but I have no clue what that is).

    Reply
    • Valerie Lugonja says

      September 29, 2021 at 5:31 pm

      Well, google it.
      You will find a lot of information.
      If you are interested in learning more, let me know and I will be happy to provide an online introduction to you if you are in Canada, or refer you to one of my many Thermomix Consulting friends and colleagues around the world.
      🙂
      Warmly,
      Valerie

      Reply
  6. Sonja Truesdale says

    November 17, 2021 at 1:24 am

    Hi Valerie.

    Thank you for sharing both sesame seed crackers and the Yoghurt Cheese Balls.

    Initially I was only setting out to make the sesame seed crackers as I want a healthier biscuit for my son who has Epilepsy, Global Developmental Delays and Dystonia. I am very focussed on providing as healthy and organic diet for him as I can to counter-balance his chemical medication.

    Initially I was going to make flack seed crackers, however, a friend of mine suggested that sesame seeds are a healthier alternative. She advised me of your recipe, which got me rather excited.

    I owned a TM5 from 2015 – 2020, however, I invested in the TM6 September 2020

    Beautiful awesome machine she is, I call mine Thelma 🙂 I love her, she’s my personal chef 🙂

    I use my girl to make everything, gone are the days where I buy sauce off the shelf, she introduced me to home-made bread, risotto, butter, she has opened my cooking world.

    Since accessing your website, I have become interested in making your yoghurt cheesy balls as well.

    I noticed that your machine is a TM31, am I able to use your ingredients and method in my TM6?

    I look forward to hearing from you. Once again, thank you for the recipes

    Reply
    • Valerie Lugonja says

      November 17, 2021 at 10:52 am

      Hi Sonja, I’ve had a TM31, TM5, and definitely, now – a TM6. Recipes for all past Thermomix work with the TM6, no problem. I presented the Yogurt Cheeseballs at ThermoVention last year. They are definitely a hit! So lovely to hear from you and all the best to your cooking for your son and with him!
      I assume you are in AU?
      I am in Canada. Obviously! HAHAHA!
      Let me know how it goes!
      Valerie

      Reply
  7. Mary Kelly says

    August 13, 2011 at 7:43 pm

    Hi Valerie
    I have just been introduced to your wonderful blog and have spent hours browsing through it while awaiting the arrival of my Thermomix. I want to make Yoghurt/yoghurt cheese and those yummy cheese balls. Trouble is I have Lactose and Fructose issues. I can buy lactose free milk and wondered if you have the recipe for using this.
    Mary

    Reply
  8. Valerie says

    August 14, 2011 at 7:11 am

    Mary Kelly,
    I am sorry, but I don’t have any experience with lactose free milk… if you mean soy milk – yes. I have worked with that, but making other things, not the yogurt. I would just give it a go and see what happens!
    🙂
    Valerie

    Reply
  9. Joan says

    June 26, 2023 at 12:22 am

    This yogurt recipe works very well with soy milk. I just make sure there are minimal ingredients like soybeans and water.

    Reply
  10. Valerie Lugonja says

    June 26, 2023 at 1:04 pm

    Good to know, Joan!
    Thanks so much!
    Valerie

    Reply

Leave a Reply Cancel reply

Your email address will not be published. Required fields are marked *

Recipe Rating


This site uses Akismet to reduce spam. Learn how your comment data is processed.

Search

Thermomix® Independent Consultant; Executive Team Lead Alberta

Weekly Newsletter

Saturday Morning News

More Thermomix Recipes etc »

Preserved Evans Cherries

Sour or Tart Preserved and Dried Evans Cherries: A Canadian Foodie Original

More ACF Famous Recipes or Specialties»

Strawberry Charlotte

More Winter Recipes »

Helen McKinney’s Famous Almond Cherry Shortbread

More Recipes from my mom Helen »

Connect With Me!

  • Bloglovin
  • Email
  • Facebook
  • Instagram
  • LinkedIn
  • Pinterest
  • RSS
  • Twitter
  • YouTube
projects

My Post Archives

Come On In And Kiss the Cook

Educator, Writer, Gardener and Traveler who believes in buying and eating locally, and most importantly cooking at home! [Read More …]

Connect With Me

  • Bloglovin
  • Email
  • Facebook
  • LinkedIn
  • Pinterest
  • RSS
  • Twitter
  • YouTube

Sour Cherry Crisp

More Canadian Recipes »

Lifetime Achievement Award

Canadian Web Blog Award 2013 www.acanadianfoodie.com FIRST

Vote-for-me
Best in Food NEW
This error message is only visible to WordPress admins

Error: No feed found.

Please go to the Instagram Feed settings page to create a feed.

Copyright © 2025 · Website by PoundPig