The Raspberries were Ripe and Ready!

First day home and out picking these gorgeous ruby treasures on a cool and beautiful summer morning. There weren’t many ripe as mom had picked them the day before. It wasn’t long before I was researching recipes to make a French Raspberry Tart as I have craved one for a month after seeing them so beautifully presented in every French pâtisserie in Paris. I couldn’t wait to get home and whip one up! I choose to use Laura Caulder’s recipe as a guide and followed her cookie pastry recipe to a T and it will definitely become a staple for this kind of tart! I didn’t glaze it as I didn’t want the added sugar and knew I didn’t need a glaze for preservation purposes!

I started with the pastry and translated the recipe to the Thermomix.


The butter and flour were scaled in and the butter was cut into the flour.


The sugar was scaled in an combined with the butter flour mixture.


Two egg yolks were added and the mixture was combined until it just formed into a ball. I removed it from the machine and reshaped it into a ball. That was easy! While the pastry rests in the fridge for a minimum of 30 minutes, I make the pastry cream. I am excited to use one of my new fresh vanilla beans!


I know I should be using a liquid measuring cup for the milk. I scrape one of the fresh and fragrant Bourbon vanilla beans to remove the incredibly flavourful tiny black seeds (above, right); see how beautiful the bean is once cut in two (below, left)? The bean was added to the warm milk and steeped to infuse the flavour of the bean into the milk.


Meanwhile, back to the Thermomix to make the pastry cream. I scaled in the sugar and added the yolks, then combined using the butterfly. (I now have 5 whites that I am going to save for a French Macaroon Making session on Saturday!)


Instead of putting the egg mixture into the warm milk, I sieved the milk into the egg mixture to continue to cook in the Thermomix. (It had cooled considerably, so the eggs did not need tempering.)

So many beautiful beans left in the bottom of the pan! I used a spatula to get everyone back into the cream. The flour was also added through the hold in the lid (bottom, left).


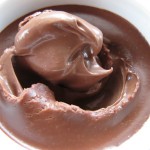
The pastry cream was thick and lovely, poured into a bowl. covered with plastic to cool in the fridge and I took out the pastry to make the tart. At this point, I was shaking my head at myself as I do not have a round French tart pan! What was I thinking when I was in all of those beautiful stores in Paris? I was very thankful for this square one, though it was a bit small.


The tart had to cool again in the fridge for another 30 minutes while I cleaned up the dishes. To avoid the sides shrinking in this tart, I covered it with parchment and filled it to the top with beans. The oven was pre-heated to 375°F and the pastry baked for 10 minutes with the beans in it. The temperature was reduced to 325°F and the pastry baked for 15 more minutes.

Voilá! The edges are a little darker than I expected because I forgot to turn down the temperature after taking out the beans!
The pastry needs to cool, so into the fridge it goes, and out comes the cool pastry cream with some heavy cream. I beat 3/4 cup of heavy cream, not the 1/4 suggested in the recipe as the pastry cream was quite dense and I wanted it much lighter than 1/4 cup of cream would be able to do. The whipped cream was then folded into the lovely cool pastry cream. It tasted like an old fashioned vanilla ice cream. YUM!


All of the cream went into the tart shell. The pan was a bit small and I did have extra pastry, but decided to use all of the “crème mousseline” (Crème Pâtissière, or pastry cream lightened with whipped cream). It fit nicely.


The pleasure of placing the little jewels on top of the tart was next. I sat and visited with my daughter who had popped by while I did this.
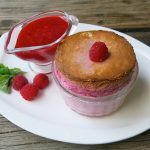
It looks exactly like the tarts did in the Pâtissière windows! I am very pleased with how easy and pleasurable this tart was to make.

We had V over for dessert and coffee our first night back it was Tuesday, and we usually have V for dinner every Tuesday. V and Vanja enjoyed the tart. Vanja is not a raspberry fan and found the tart “OK”. I took one bite, and smiled. Now, this is what I have been waiting for: a fresh, tart and creamy bit of summer. It was not sweet. The firm vanilla foundation was the perfect partner to the flamboyant raspberry flavour. Ah! Paris! The summer of 2010: I will never forget.
Laura Caulder’s Cookie Pastry Recipe
Ingredients:
- 11/2 cups (190g) all-purpose flour
- 3/4 cup (170g) cold butter, cut into pieces
- 1/4 cup (65g) granulated sugar
- 2 egg yolks
- 1/2 tsp (2 mL) vanilla (optional)
- Dried beans (for blind baking)
Instructions for Pastry adapted by me for use with the Thermomix:
- Scale the flour and butter into the TM bowl; cut butter into the flour for 5 seconds on Turbo (will be fine crumbs)
- Scale the sugar into the TM bowl for 5 seconds on Turbo (see above photo)
- Add the egg yolks and for 3-5 seconds on speed 4-5 just long enough for the mixture to come together into a ball
- Pat into a disk, wrap in plastic, and chill at least 30 min before lining tart pan, or refrigerate overnight
- Roll out and line tart pan (thickness of 1/4 inch and lip of 1/2 inch); chill again for 30 min before baking
- Pre-heat oven to 375°F; place tart shell on a baking sheet and blind bake the pastry by lining it with a generous piece of parchment filled with dried beans to the very top to give the sides support so they won’t shrink (this also ensures a crisper crust)
- Blind bake for 12 min.; remove to a heatproof surface and take away parchment and beans (preserve beans for future use); prick crust bottom all over with a fork and replace in the oven, turning the heat down to 325°F and bake for 13-15 more minutes
Instructions for Pastry:
- Mix the flour and butter with your fingers until they turn into fine crumbs; mix in the sugar
- Add the egg yolks and mix with your fingers just long enough for the mixture to come together into a ball
- Pat into a disk, wrap in plastic, and chill at least 30 min before lining tart pan, or refrigerate overnight
- Roll out and line tart pan (thickness of 1/4 inch and lip of 1/2 inch); chill again for 30 min before baking
- Pre-heat oven to 375°F; place tart shell on a baking sheet and blind bake the pastry by lining it with a generous piece of parchment filled with dried beans to the very top to give the sides support so they won’t shrink (this also ensures a crisper crust)
- Blind bake for 12 min.; remove to a heatproof surface and take away parchment and beans (preserve beans for future use); prick crust bottom all over with a fork and replace in the oven, turning the heat down to 325°F and bake for 13-15 more minutes
Recipe for Crème Pâtissière and Crème Mousseline
Ingredients:
- 1 cup milk
- half of a vanilla bean ( used the entire bean) OR 2 teaspoons vanilla bean paste
- 3 egg yolks
- 1/4 cup sugar
- 2 tablespoons flour
- 1 tablespoon framboise liqueur (I didn’t use it this time)
- 1/4 cup heavy cream (I used 3/4 cup)
- 1 pound fresh raspberries (I didn’t weigh them, I just used what I had)
- 1 9-inch/23 cm cookie crust, baked
Instructions adapted by me to make in the Themomix:
- Put the milk in a saucepan; split the vanilla bean, scrape the seeds into the milk and add bean into the pot
- Heat to a simmer, remove from heat, cover, and set to infuse 10 to 20 minutes
- Scale the sugar into the TM bowl and add the yolks; insert the butterfly and beat until pale for 10 seconds at speed 4
- With the time set for 10 seconds and the speed at 4, add the flour through the hole in the TM lid
- Strain the milk gradually into the egg mixture; set the time for 4 minutes and the temperature at 100°C, bring mixture to a boil at speed 4 and cook one minute (you will have to watch when the mixture comes to a boil and adjust time accordingly)
- Stir in the framboise, if using
- Strain into a bowl and cover with plastic wrap; set aside to cool (this is Crème Pâtissière)
- When chilled, whip the cream and gently fold it in (this is now Crème Mousseline)
- Spread the cream evenly in the base of the tart and arrange the berries neatly over top
Instructions for Pastry Cream:
- Scale the sugar, vanilla bean paste and place the yolks in to the TM bowl; insert butterfly and beat from 2 minutes at speed 4
- Scale in flour and milk; set time for 5 minutes, temperature to 90 on speed 4
- Set time for 2 minutes, temperature to 100 on speed 4; watch for the temperature to reach 100 and cook for only and exactly 1 minute after that
- Strain into a bowl and cover with plastic wrap; set aside to cool (this is Crème Pâtissière)
- When chilled, whip the cream and gently fold it in (this is now Crème Mousseline)
- Spread the cream evenly in the base of the tart and arrange the berries neatly over top
Recipe for the Glaze: French Raspberry Tart (which I didn’t use this time, but may next time)
Ingredients:
- 1 1/2 cups red currant jelly
- 2 T Framboise
Instructions:
- Place ingredients into a small sauce pan and bring to a boil; cook until mixture pours from the spoon in drops
- Brush a thin coating of glaze over the tart shell to seal; allow to set for 5 minutes
- Spread filling in bottom of pastry shell; arrange fresh raspberries on cream to achieve maximum visual impact
- Coat berries with remaining glaze using a very soft pastry brush (the glaze may need to be reheated to insure easy spreading)
- Refrigerate the tart until ready to serve


My goodness Valerie, you are back with a bang! With a post after my heart, I adore anything with cream and raspberries!
Welcome Home!
Just beautiful! Please look away while I steal a big fat piece.
Hey, I haven’t seen Beavy daaaaahling, I miss him.
*kisses* HH
Omg! Seriously Valerie, DROOL!!!!!! I’m already having troubles sleeping and this is definitely not helping me. I know where you live and it’s taking every bit of will power I have in my body to prevent me from showing up at your doorstep at 2:00 in the morning with a plate and spoon. VALERIE IS DEFINITELY BACK Y’ALL! Vanja, you lucky ducky (even though you’re not so crazy about raspberries). Wonderful recipe (way outta my league) and beautiful tart Valerie!
I think tarts are generally underutilized – I certainly think they should have a more prominent place in our food scene. They easily trump cupcakes, imo. They can even be more healthful than pie – only one crust!!
A classic and delicious tart. Next to blueberries and blackberries raspberries are my ultimate berry…let’s just say I love berries of all kinds.
What a pleasant and pretty raspberry tart! I love your square pie pan too.
p.s Where is your little pet?
great recipe. Those look wonderfule.
Lovely. I’ve been enjoying my parent’s bumper crop of raspberries for about 3 weeks. Maybe I’ll make a tart for Sunday supper.
Gorgeous.
This tart looks so beautiful and appetizing! Looking at the ingredients for the crust I bet it tasted so rich and crumbly, like a delicious cookie and the cream sounds luscious! I want a slice or two real bad!
What a beautiful raspberry tart. Just stunning. The idea of picking fresh raspberries just brings it to a new level.
Nice to see the Thermomix in action to make such a beautiful tart! I agree – no sugar glaze needed on beautiful raspberries. I’m glad you used a real vanilla bean, as I think there’s nothing like a real bean. So much better than the bottled stuff.
Great recipe, Valerie!
Let me know if you try it, Jessie!
🙂
Hey Valerie, this is a nice way to start home life out again after a vacation (smile)! Your crust looks beautiful, and I’m craving raspberries now. They look wonderful. I will definitely be trying something like this soon, Valerie. It looks too good to not attempt it before the summer is over…
wow… looks sooo good!
VAL – I’m a vanilla gal all the way, and oh, raspberries just so happen to be my favorite baking and plating fruit – ‘and’ flavor for that matter. This tart is STUNNING, and I would give anything to grab a huge hunk of it and dig in. Not to mention, your photos are awesome!
That said, just read through the rest of your trip, and wow, what a time you had and what a haul you brought you back! One day *knock wood*, I’ll have several entries pertaining to my future trip around Europe, France being my first stop 🙂 Glad you had such an amazing time!
Val, your blog is a treasure trove of inspiration and knowledge… I am still finding my way around the thermomix (and yes, you are right, the vanilla shredded when I made my pastry cream – I sieved it instead) and your blog has so many recipes I can truly use!