• Home
  • About
    • Privacy Policy
    • Work with Me
    • Media Kit
    • Evolv Health: Valerie’s Story
    • Personal Stories
    • Press
    • Year in Review
  • Thermomix® Independent Consultant
    • Thermomix® Independent Consultant
    • Client Testimonials
    • Recipes Developed by Valerie
  • Projects
    • Cheesepalooza
      • Cheesepalooza Challenges
      • Cheesepalooza Participants
      • Preparation for Cheesepalooza!
      • Basic Ingredient and Supply List
      • Ingredient and Matierial Suppliers
    • Dueling Daughters Project 2014
    • Eat Alberta
    • Gramsy Glimpses
      • Gramsy Glimpses Vignettes
    • Project 2019: Valerie’s Personal Evolv Health Story
    • Project 2017: Cooking in the Kitchen With….
      • Completed Project 2017 Posts: Cooking in the Kitchen With….
      • Project 2017: Cooking in the Kitchen With… PARTICIPATE
      • Project 2017: Cooking in the Kitchen with….Schedule
    • Slow Food Edmonton Tastings
      • Participate!
    • The Canadian Food Experience Project
      • Participate!
      • Participants
      • Challenges and Round Ups
      • Canadian Food Heroes Series
  • Events
    • Baby Shower
    • Food Blogger Meetings
    • Promotions
    • Restaurant Reviews
    • Reviews (Products, Books, and Events)
  • Philosophy
    • In a Nutshell
    • Local Produce/Producers
    • Slow Food
    • Teaching
  • Travel
    • Bosnia
    • British Columbia
    • California
    • Croatia
    • Culinary Tourism
    • Farmer’s Markets
    • France
    • Greece
    • Hawaii
    • Italy
    • Louisiana
    • Maritime Provinces
    • Massachusetts
    • Mexico
    • Montenegro
    • Nova Scotia
    • Prince Edward Island
    • Quebec
    • Serbia
    • United Kingdom
    • Utah
  • Trends
  • Store
  • Privacy Policy
  • Privacy Policy for A Canadian Foodie
  • Valerie’s Image

A Canadian Foodie

Canadian Food Recipes; Preserving Canadian Food Practices

  • A La Carte
    • Appetizers
    • Drinks
    • Evolv Health Reboot Recipes
      • Reboot Phase 1 Mains
    • Garnishes
    • Salads
    • Sauces Dressings Rubs
    • Sides
    • Soups and Stocks
  • Breakfast & Brunch
  • Cheese
    • Blue/Stinky
    • Firm
    • Fresh
    • Hard/Pressed
    • Cheesepalooza Challenge
    • Cheesepalooza Round Up
  • Desserts
    • Cakes
    • Cookies, Bars and Squares
      • Christmas Cookies
    • Ice Cream, Sorbets and Frozen Yogurt
    • Icings/Frosting and Pastry Creams
    • Other
    • Pies and Tarts
    • Puddings
    • Sweets and Treats
  • Doughs and Crusts
    • Biscuits
    • Bread Buns and Flatbread
    • Crackers
    • Donuts, Frybreads and Such
    • Dumplings etc
    • Pasta
    • Pastry
  • Mains
    • Beef
    • Casseroles
    • Chicken/Duck/Goose/Turkey
    • Marinades and Rubs
    • Pasta Dishes
    • Pork
    • Potluck
    • Savory Pies Pastries
    • Seafood and Fish
    • Stews
    • Vegetarian
    • Veal
    • Wild Game
    • Wraps Pizzas Casual Food
  • Seasonal
    • Autumn
    • Spring
    • Summer
    • Winter
    • Holiday
      • Christmas
  • Gardens
    • Foraging
    • My Garden and From My Garden
    • Preserves
    • Zone Three Harvest
  • Tastings
  • Kids
  • Canadian Food
    • Atlantic Provinces
    • Canadian Aboriginal Food
    • Canadian Berries
    • Canadian Cakes
    • Canadian Doughs
    • Canadian Drinks
    • Canadian Fish
    • Canadian Food Heroes
    • Canadian Food Main
    • Desserts
    • Grandma Maude’s Family Recipes
    • Mom Helen’s Famous Family Recipes
    • Canadian Products
    • Sunday Suppers
    • Wild Food

Candied Oranges and Kumquats

July 6, 2010 by Valerie Lugonja 35 Comments

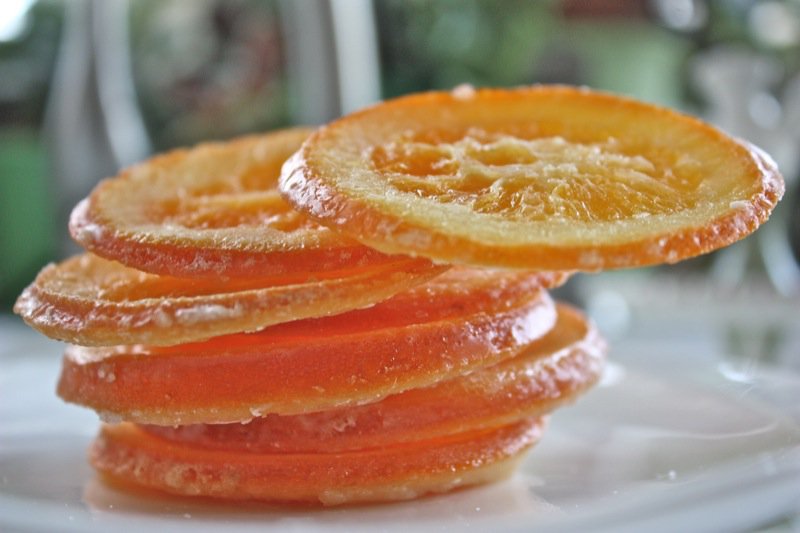
A great garnish or treat!

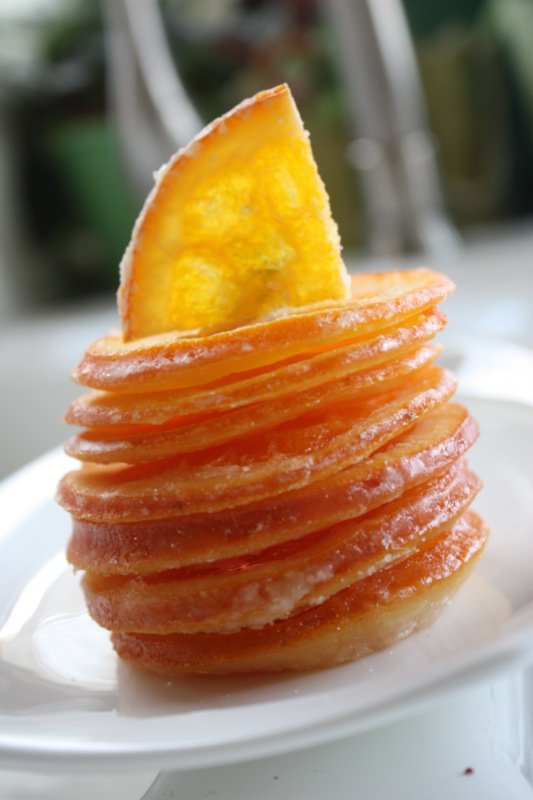
These sugared slices of fruit are fragrant and flavourful and burst with bright fresh citrus notes on your tongue. YUM!

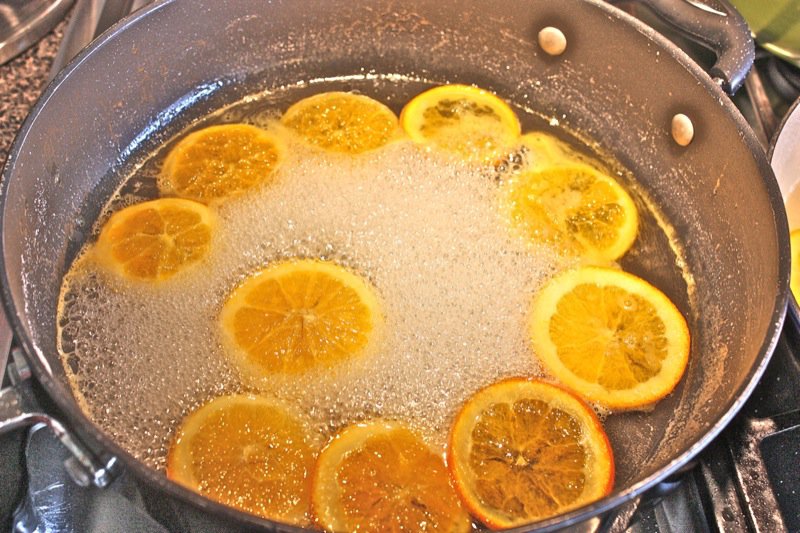
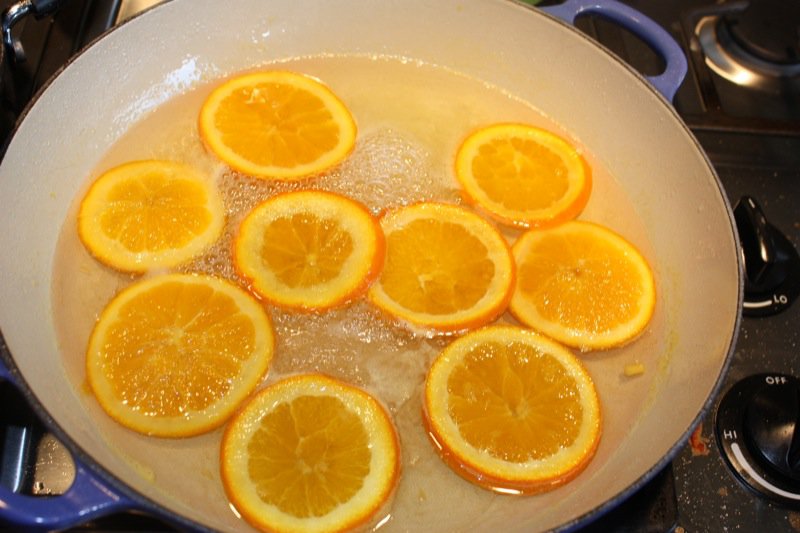
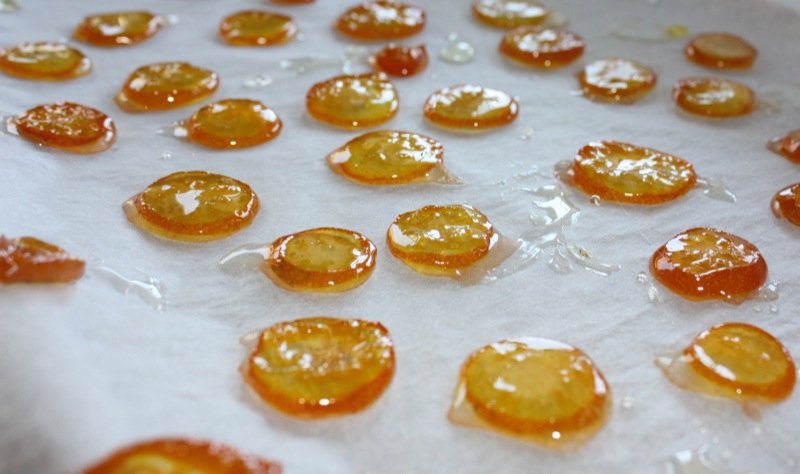
Thinly slice the oranges and the kumquats nd place in a frying pan with the sugar syrup.

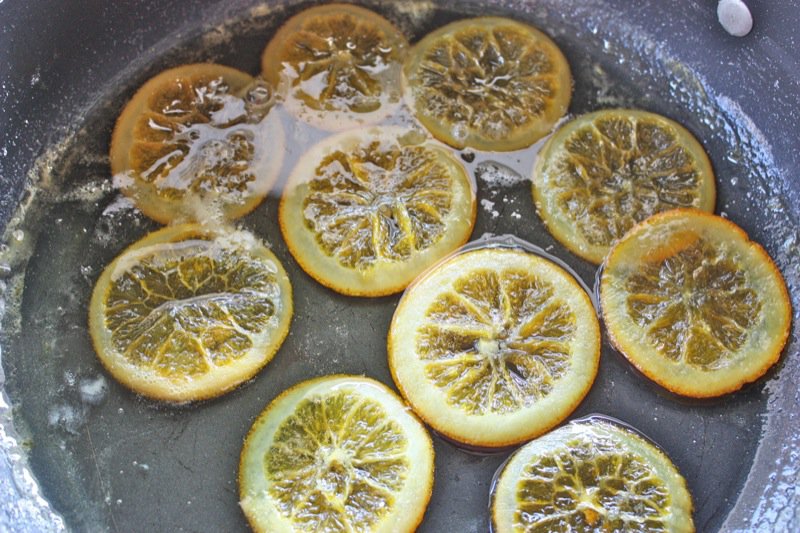
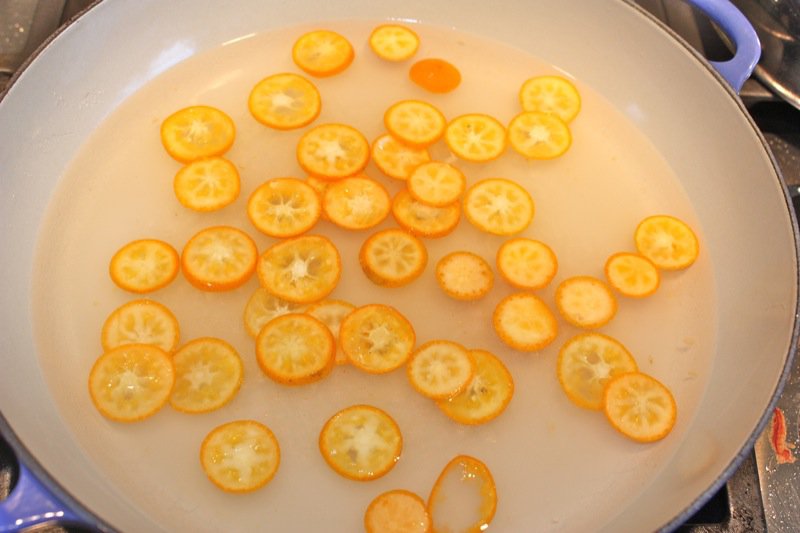
Bring to a boil at medium heat, then turn to medium low to maintain a low boil; turning slices once or twice until the liquid becomes a thick syrup and the slices are translucent (about 20-25 minutes).

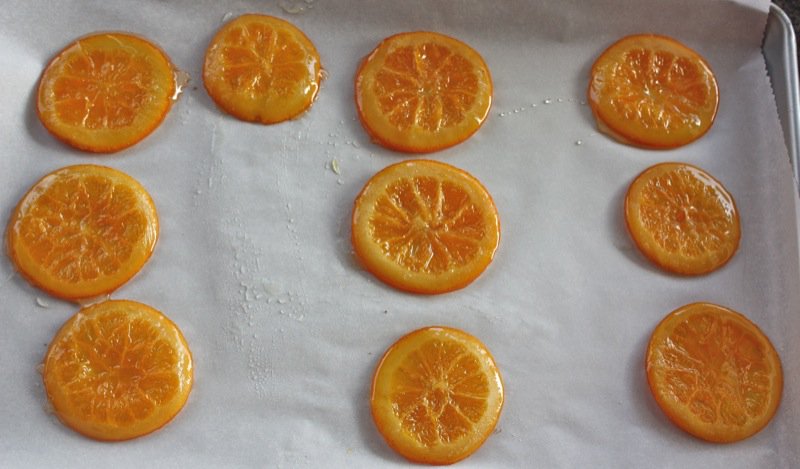
Remove with tongs and place on parchment to dry overnight or dry in convection oven at 170 degrees F for 1-2 hours.

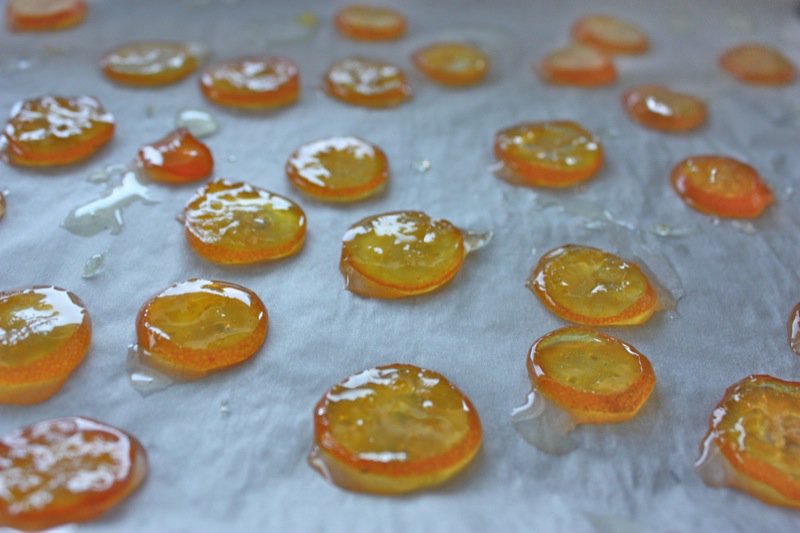
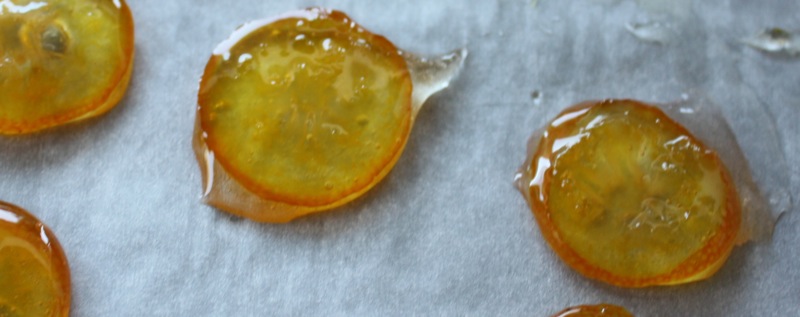
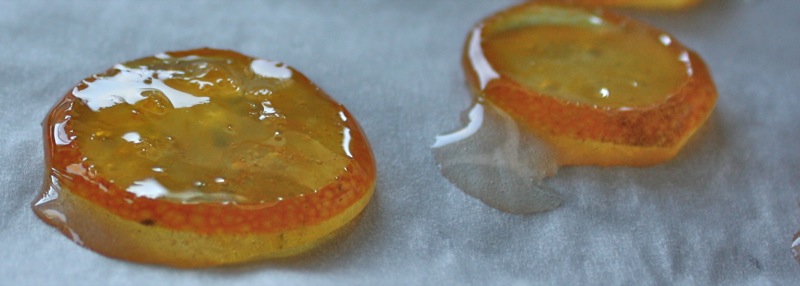
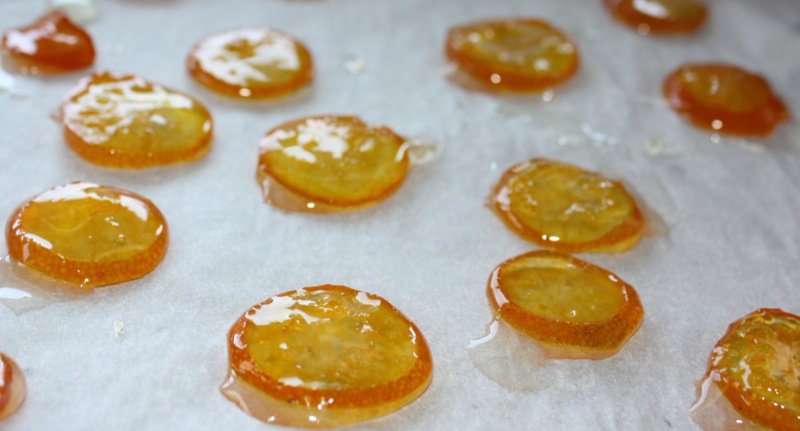
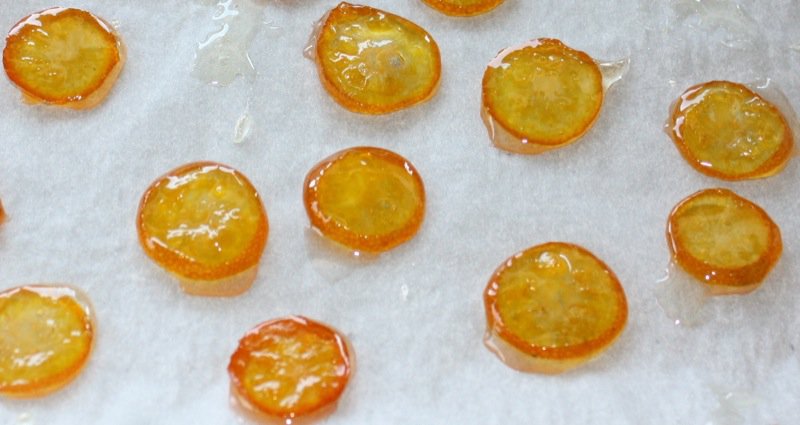
When they are dry, they will not be sticky to touch, but will be best stored between layers of parchment in a dry, cool, and dark place until ready to use.

These will keep up to 2 weeks and then will start to go “sugary”.

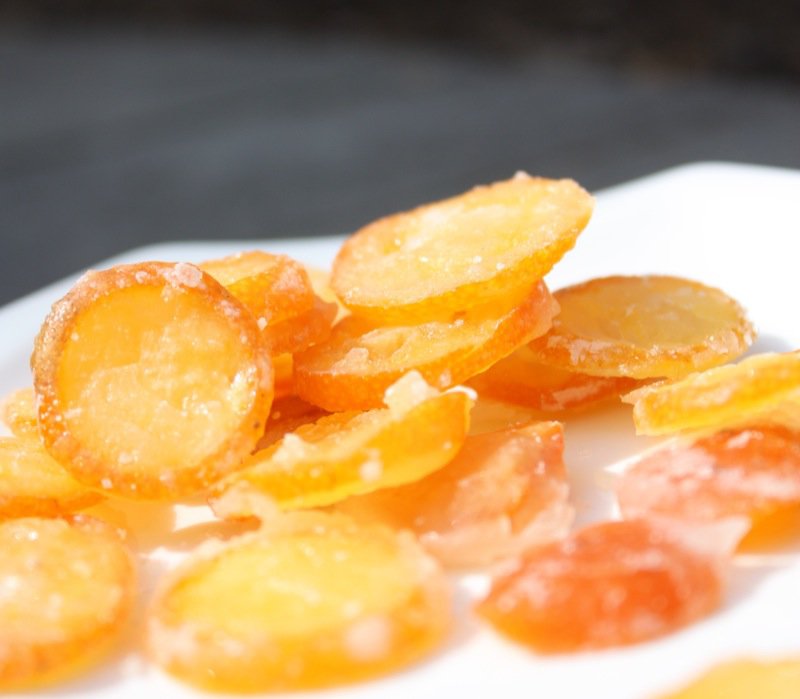
I cut the in quarters and served them with tea at mom’s 80th Birthday party. The are also delicious with half dipped in chocolate similar to the Orangettes I did at Christmas last year.

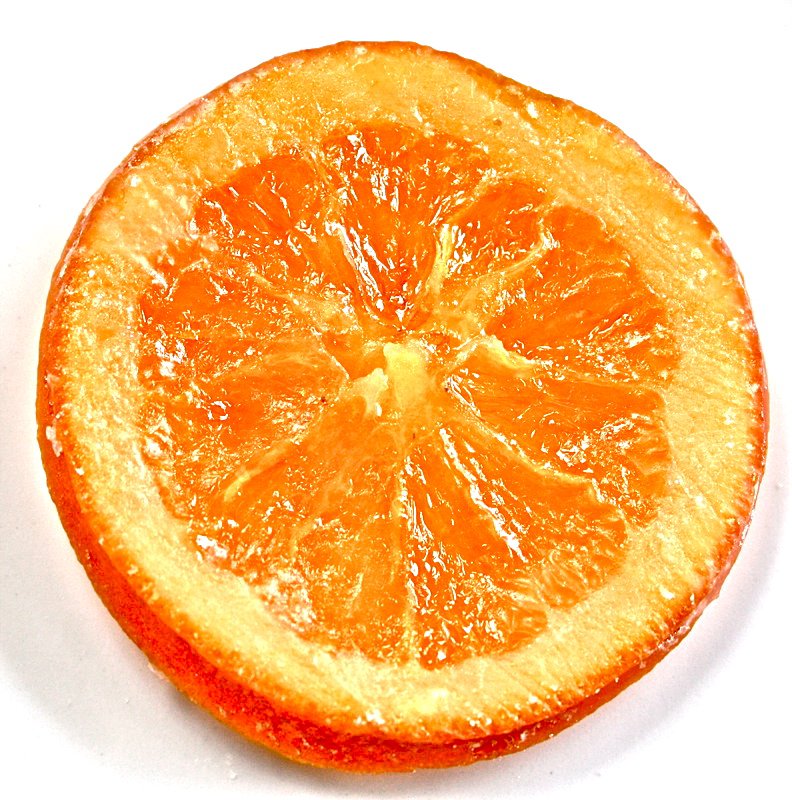
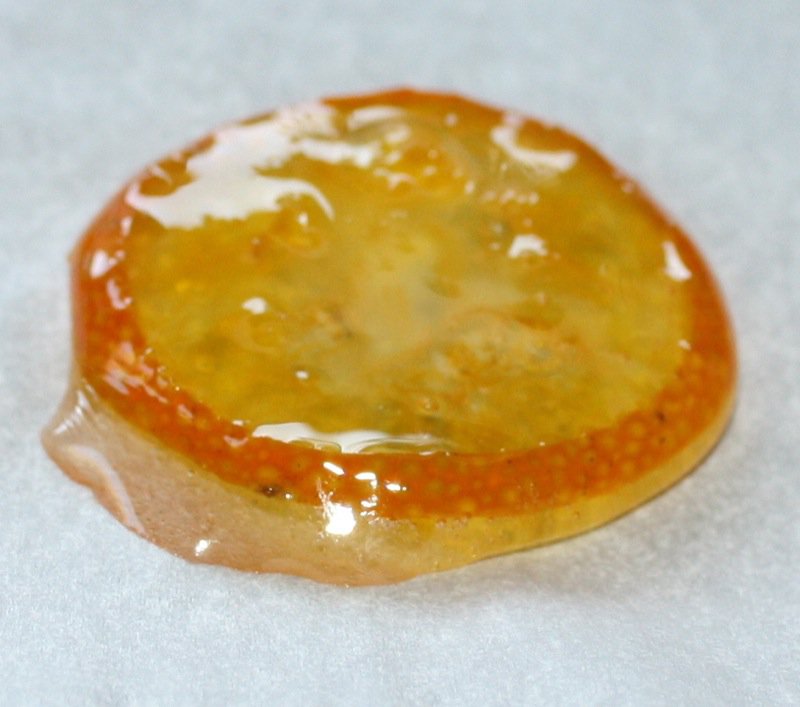
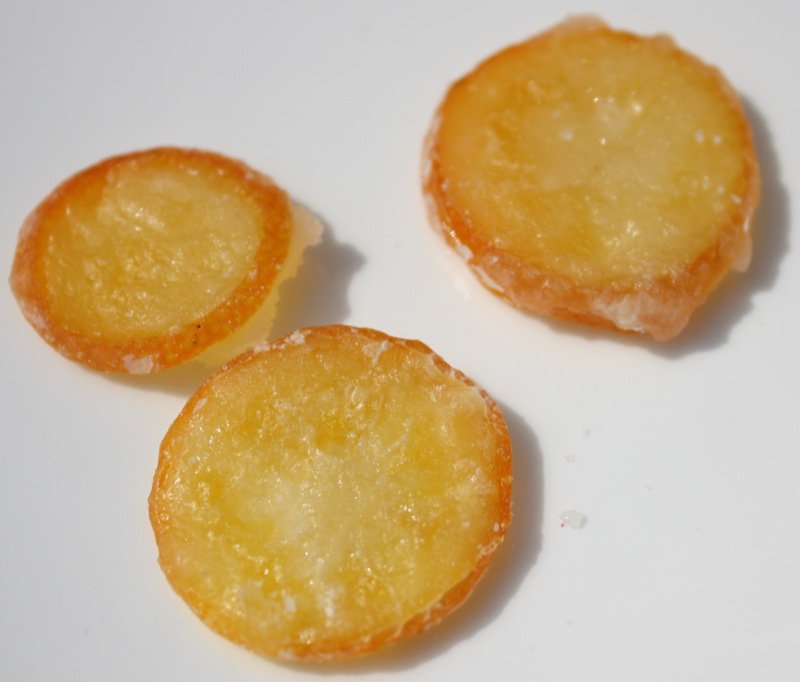
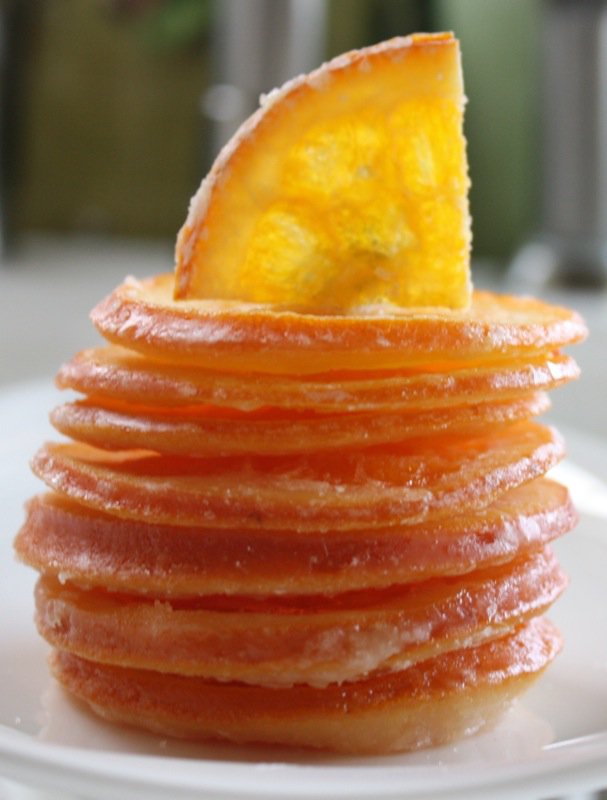
Is that slice of orange not the most gorgeous slice of fruit you have ever seen? Truly?

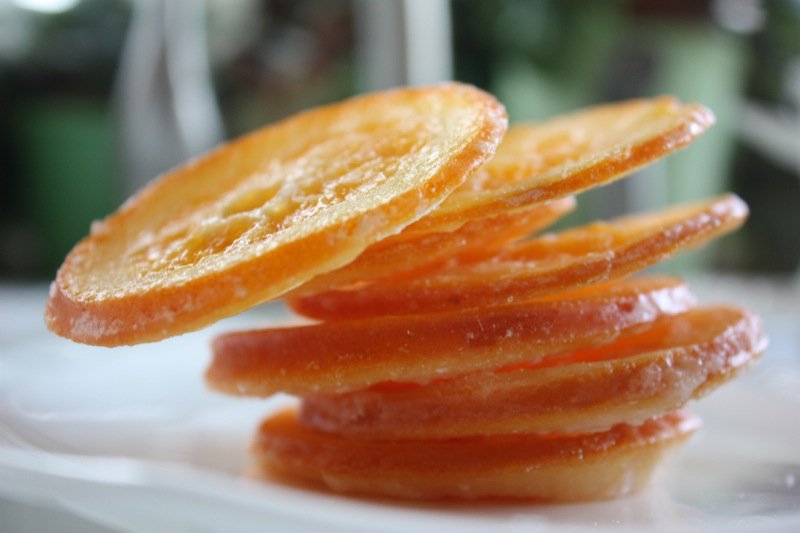
Completely worth the little effort it took to create. Try them! They are easy to make, gorgeous to look at, fragrant to the nose, and absolutely delicious to eat.

Tweet2
Pin15
Share
17 Shares

Filed Under: Garnishes, Preserves, Sweets and Treats

About Valerie Lugonja

Like what you see? SUBSCRIBE TO A CANADIAN FOODIE
Educator, Writer, Gardener and Traveler who believes in buying and eating locally, and most importantly cooking at home! As a brand new Gramsy, so be prepared to hear a lot about this new role in her life!
Please connect with Valerie to buy a Thermomix Machine!

« Herb and Mixed Spring Greens with Traditional Spring Prairie Salad Dressing
Steak Tartar, Berthillon Ice Cream then French Onion Soup and Crepes at Montmartre »

You might also enjoy...

Slow Food Canning Bee 2011 Two : Pickles
Homemade Salsa: Rainbow in a Jar!
Authentic Sugar Plums: Merry Christmas from Canada!
Salted Caramel Macaron
Pucker Up 2014: Sour Cherry Juice

Comments

  1. bellini valli says

    July 6, 2010 at 5:57 pm

    These make wonderful edible decorations on cheesecakes, etc. Way betyter than anything you could ever purchase.

    Reply
  2. Sarah Galvin (All Our Fingers in the Pie) says

    July 6, 2010 at 6:09 pm

    A little bit of glucose or corn syrup in the mixture will help fend off the crystallization. Look lovely!

    Reply
    • Valerie says

      July 6, 2010 at 7:27 pm

      Great idea, Sarah! I have never seen this as an option in any of the recipes. I wonder why… it makes perfect sense, now that you mention it. Maybe someone else will chime in and say whether it works, or why it might not.
      🙂
      Valerie

      Reply
  3. lequan@luvtoeat says

    July 6, 2010 at 6:13 pm

    Ooh, those look beautiful Valerie, and super easy. My kinda recipe…teehee. These would go great with any kind of baked good huh? Knowing me, I’d probably hide in the pantry away from my kiddies and eat them as candy 😛 I’m off to superstore on my fig mission. Thank you!

    Reply
  4. Nisrine@Dinners & Dreams says

    July 6, 2010 at 6:14 pm

    These candied oranges look gorgeous. I first read the title “Canadian Oranges” and was wondering for a while what those were. I guess it’s time for bed:)

    Reply
  5. bruleeblog says

    July 6, 2010 at 7:31 pm

    In Barcelona I had candied oranges dipped in dark chocolate and they were to die for. Did you use a sharp knife only or did you use a mandolin?

    Reply
    • Valerie says

      July 6, 2010 at 7:40 pm

      Bruleeblog: I used a sharp knife because I didn’t want them paper thin… I think they would have to be frozen to use a mandolin… they were not super thin… but perfect for what I wanted them for… and really yummy. Especially with tea.
      🙂

      Reply
  6. Christine @ Fresh Local and Best says

    July 6, 2010 at 10:17 pm

    These candied slices of citrus are tantalizing to the eyes. I’m sure they also taste amazing.

    Reply
  7. Heavenly Housewife says

    July 6, 2010 at 11:51 pm

    You know what? I really want to try these. One of my favorite treats are glace fruits dipped in chocolate. They are very hard to find and not to mention expensive. How cool is that, that you gave a recipe to make your own.
    Thank you daaaaaaahling.
    *kisses* HH

    Reply
  8. Angie's Recipes says

    July 7, 2010 at 12:22 am

    Valerie, THANK YOU!!!!!!! I love these candied oranges! The photos you took are electrifying!

    Reply
  9. Angie's Recipes says

    July 7, 2010 at 12:24 am

    How much of the sugar and water I should use to make the syrup?

    Reply
    • Valerie says

      July 7, 2010 at 4:36 am

      Thank you, Angie – for letting me know I left out the most important part. I will go back and write in the recipe. For now, I like organic oranges – Cara Cara are my favourite for this recipe. Use a 2″4.5 ratio (water to sugar) depending upon how many oranges you will do. Whisk the sugar with the water, then bring to a simmer and cook for 8 to 9 minutes (If you took the sugar’s temperature with a candy thermometer it would be at the soft thread stage, 230 to 234 degrees F) to melt the sugar completely. Add the slices and simmer gently, reducing heat to retain a simmer. Cook until the peels get translucent, about 30 minutes. Resist the urge to stir the peels or you may introduce sugar crystals into the syrup. If necessary, swirl the pan to move the peels around. Gently turn each slice once. Remove with tongs and set on parchment paper to dry, or roll in sugar and dry on a rack, overnight (or, as I said, in the oven!)

      Reply
  10. Andy says

    July 7, 2010 at 4:43 am

    Val, looks great, I especially like the main picture with the stack ‘o oranges off kilter. Nice composition….
    Now just need to make me some!

    Reply
  11. Jessie says

    July 7, 2010 at 5:24 am

    Candied kumquats?? Genius! I confess that I don’t like kumquats, but if they were candied with sugar I think I would make room for them in my diet 😉 Your pics are too gorgeous for words. I never knew that orange slices could be so exquisite.

    Reply
  12. Simone says

    July 7, 2010 at 6:37 am

    That looks great Valerie! I’ve never made candied fruits before, but then… so much I haven’t done or made yet.. 🙂

    Reply
  13. Kelley says

    July 7, 2010 at 10:50 am

    Beau-ti-ful!!!

    Those look glorious. They do not seem too difficult to make either – yet they look very impressive.
    Easy and impressive are my favourite!

    Reply
  14. marla {family fresh cooking} says

    July 7, 2010 at 3:59 pm

    Valerie, these candied oranges & kumquats are gorgeous!!! I bet they are delicious. I would put them on everything from parfaits to granola to munching on all by themselves. Ohhhh, paired with dark chocolate they would be sinful. You could dip ’em in chocolate…..OK now I am fantasizing. xo

    Reply
  15. Joan Nova says

    July 7, 2010 at 4:57 pm

    Yes! Gorgeous and a treat! I’d love to have a pile of those in front of me right now.

    Reply
  16. bianca says

    July 8, 2010 at 8:50 am

    Who needs garnish; I would eat these babies just as is!
    Great post!

    Reply
  17. Aletheia says

    July 8, 2010 at 12:31 pm

    WOW these look like the PERFECT treat. It’s sass, simplicity, and elegance, all bundled into one crispy slice. Arharhar. I LOVE kumquats to pieces though, and don’t think I could ever change them because I’m just so so attached to the way that they taste plain and simple. They must be expensive in Edmonton though, no? They are here, anyway. I pine over my aunt’s kumquat tree (she lives in Southern California)… le sigh.

    <3 Aletheia

    Reply
  18. Magic of Spice says

    July 8, 2010 at 6:09 pm

    These are stunning! And your photos are just amazing:)

    Reply
  19. Devaki says

    July 8, 2010 at 7:02 pm

    Dear Val – So much more luscious and delectable than orange peels which is what I usually fix. Lovely pics as well!

    Too bad kumquats have disappeared from markets in my town….sigh…they make such a short appearance 🙂

    Ciao, Devaki @ weavethousandflavors

    Reply
  20. stella says

    July 9, 2010 at 6:12 am

    Hey Valerie, this is a great post for me, as there is a kumquat tree in my neighborhood. It’s right near the park too, so it’s not on anyone’s property and it’s in an area of the park that is not upkept (good as they don’t spray the pesticides there!)… I always pick them, so I’m bookmarking this! Won’t be able to use it till Fall/Winter though-that’s when they grow here (smile)…
    Hope all is well, Valerie, and have a great weekend. Stella

    Reply
  21. tasteofbeirut says

    July 9, 2010 at 10:46 am

    I made these with oranges but never with kumquats;great idea Valerie, plus I like your method better than mine! Gorgeous photo, totally enticing!

    Reply
  22. Jennifer @ Maple n Cornbread says

    July 10, 2010 at 12:46 pm

    WOW stunning photos!!! I have done this with oranges but never with precious little kumquats, which now I am going to have to! Thanks for the inspiration and sharing!

    Reply
  23. Velva says

    July 11, 2010 at 5:51 pm

    I am a sucker for candied fruits. I tried making them once but, they did not nearly as good as what you created. awesome. The idea of using kumquats was a really nice addition too.

    Reply
  24. El says

    July 12, 2010 at 9:59 am

    I’ve always wanted to make these. Thanks for posting the recipe.

    Reply
  25. mary says

    July 12, 2010 at 6:04 pm

    These look fantastic! I’ve made candied peel before for Christmas, but this is even better. I’d probably eat most of them plain, but I bet they’d be amazing shopped up in a pound cake. On my (very long) to bake list!

    Reply
  26. Trissa says

    July 13, 2010 at 4:18 am

    What a great idea – I see these gorgeous candies in the gourmet grocer near our place – terribly overpriced for something (I didn’t realize) that is so easy to make.

    Reply
  27. Kitchen Butterfly says

    July 13, 2010 at 11:57 am

    Yummy, yum. yum. I’ve always wanted to make candied kumquats.and I will definitely give them a try. The photos are lovely – my nose is bursting with orange and kumquat bouquets!

    Reply
  28. sweetlife says

    July 13, 2010 at 2:20 pm

    I love these, they would easily be perfect on any summer treat, even to spruce up coctails..great pics

    sweetlife

    Reply
  29. Lisa Taylor says

    July 18, 2010 at 12:54 am

    Oh wow..I love candied oranges (by themselves, not in baked goods for some reason). I candied blood oranges for a cheesecake I made last year and used them as garnish around the top. However..never candied kumquats, much less ate them..lol, so I’m going to follow your directions and try it! As always, a beautifully photographed and yummy, informative entry!

    Reply
  30. lalaine says

    August 10, 2010 at 2:43 pm

    That is certainly the most gorgeous slice of orange I’ve seen!

    Reply
    • Valerie says

      August 10, 2010 at 3:34 pm

      Thank you, Lalaine! A friend from the blogoshere, Andy, from ThatJewCanCook, submitted it to Taste Spotting and they rejected it for not being sharp enough.
      🙂
      Valerie

      Reply

Leave a Reply Cancel reply

Your email address will not be published. Required fields are marked *

Recipe Rating


This site uses Akismet to reduce spam. Learn how your comment data is processed.

Search

Thermomix® Independent Consultant; Executive Team Lead Alberta

Weekly Newsletter

Saturday Morning News

Enchiladas Potosi Style or Enchiladas Potosinas

More Thermomix Recipes etc »

Preserved Evans Cherries

Sour or Tart Preserved and Dried Evans Cherries: A Canadian Foodie Original

More ACF Famous Recipes or Specialties»

Stained Glass Cookies: Happy Valentine’s Day!

More Winter Recipes »

Thermomix Christmas Stollen: Mom’s Famous Recipe

More Recipes from my mom Helen »

Connect With Me!

  • Bloglovin
  • Email
  • Facebook
  • Instagram
  • LinkedIn
  • Pinterest
  • RSS
  • Twitter
  • YouTube
projects

My Post Archives

Come On In And Kiss the Cook

Educator, Writer, Gardener and Traveler who believes in buying and eating locally, and most importantly cooking at home! [Read More …]

Connect With Me

  • Bloglovin
  • Email
  • Facebook
  • LinkedIn
  • Pinterest
  • RSS
  • Twitter
  • YouTube
Canadian Butter Tarts

Canadian Butter Tarts: My Grandmother Maude’s Famous Heritage Recipe

More Canadian Recipes »

Lifetime Achievement Award

Canadian Web Blog Award 2013 www.acanadianfoodie.com FIRST

Vote-for-me
Best in Food NEW
This error message is only visible to WordPress admins

Error: No feed found.

Please go to the Instagram Feed settings page to create a feed.

Copyright © 2025 · Website by PoundPig