So much unfinished…

Sanja is the first cousin of our very dear friend, V. It is a well known fact in the “œformer Yugoslavian” community that Sanja makes the absolute best baklava. I thought V’s wife, Amina’s, was really good, so I asked her to teach me how to make it. She absolutely refused and said the only way to learn how to make this would be from the Master (or should I say “œMistress”) of Baklava: Sanja! I was not disappointed, as I had tasted Sanja’s baklava, and it was extraordinary! OK! Then please ask Sanja to teach me how to make it, was my plea.
Amina was never one to disappoint. As a matter of fact, it seemed to be that her raison d’être was to please those she loved. Especially her husband. That is why she worked to learn how to make this special Turkish dessert. V loved it. So, Amina asked Sanja on my behalf, to teach me. It wasn’t until Christmas that Amina mentioned that Sanja had accepted the challenge! I was so excited. Amina would arrange a date for us. However, that never happened, Amina died very suddenly February 4th of this year (2009) and so very many of us were left with many plans to share with her. She is so loved.
Amina shared my love of preparing food. She had a deep appreciation for any food prepared for her, and was always thinking about what I could learn or enjoy when she was preparing for me, or my husband. She knew I shared the depth of her appreciation. I am rarely in my kitchen without remembering her.

Sanja made the time for my new learning, and we shared a beautiful Sunday afternoon together, making baklava, drinking coffee, and talking and remembering our dear Amina. So much of my life, particularly in my kitchen, is connected with Amina. She, her husband and mine, came to Canada together from the former Yugoslavia. I have learned so much about perfection, and about giving and loving, from her. So, on this day, as Sanja and I made baklava together, I was thankful to Amina as the catalyst of this opportunity. Though she could not be with us in person, she was with us.


We started with Sanja’s handy nut grinder. When I did it again, at home, I used my Thermomix. It worked like a charm though I must confess that the chat time was fun while the nuts where being ground “¦and there is a certain satisfaction derived from doing something slowly, by hand. (“¦and a completely different kind of satisfaction being able to do something quickly, but still homemade!)


Sanja likes a few raisons in her baklava, so she soaks them in warm milk for a while, then strains them and adds them to her filling.


A few breadcrumbs on each layer is a trick her mother taught to her. “œJust a few, to soak up the butter.” She sprinkled such a miniscule amount per layer, I wondered if it did make a difference, but who am I to question a good thing?

So, we are now set. The filling needs to be stirred. The butter is melted, the bread crumbs are ready, and the phyllo pastry is opened last. Sanja greased the bottom of the Pyrex casserole dish with a little butter. “œJust a little.” And we unrolled the phyllo. I think we need to be quick here!


Place the first layer of phyllo in the Pyrex pan so that 1/2 of its surface area on one side is completely covered with butter, then fold it in 1/2, with the buttered side in. Lay it onto the bottom of the Pyrex pan. Enough butter remains. Continue this process for three pieces of phyllo, or six layers. That means that you again butter sparingly the top of the first folded piece of phyllo. Place 1/2 of the surface area of the second piece onto the top of the first piece buttered sparingly. This side will be covered with butter. Again, fold it in 1/2 with the buttered side in, lay it on the top of the first folded layer where enough butter will remain. This way, you are buttering sparingly, yet each layer you butter is actually buttering two layers of phyllo. I was thrilled with this little trick. Once three folded phyllos are down you have six layers. That is when you add the filling. Each layer of filling is about 1/4 a cup of the filling mixture, spread evenly over the surface, particularly to the edges. This doesn’t look like it goes to the edges, but it did.


Once the filling is used up, and the Pyrex pan is full, you are ready to cut your baklava. Do not butter the top layer. Start by cutting it in half, and then into inch and a half strips all the way across. Then start at the top of one end row and cut diagonally down to the bottom of another end row. Make the diagonal lines also about an inch and a half apart. I was really happy with my first effort, but then again, I am “œexperienced”! Once these slices are cut, and all the way to the bottom, then take your remaining butter and pour a little down each long crack. Yes, it sounds a little odd, but it does make a difference. Do not worry about buttering the top. Worry about gently getting a little butter into each cut both vertically and diagonally. Once that is done, you are ready for the oven, and the topping!


While the baklava is baking, you will need to make the sugar syrup. The sugar and water go on the stove at a low boil with some lemon slices for about the same amount of time as you bake the baklava. The first 15 minutes the oven is high and you brown your baklava, then you cover it loosely with foil, and turn the oven down for about 45 more minutes. Keep ensuring that your syrup is gently boiling for at least an 45 minutes.


Then, take the baklava out of the oven. Ensure the syrup has thickened, and pour it over the hot baklava slowly, from one end to the other. You may need to let it rest for a second or two, then continue to pour, or repeat places you missed. This is the fun part!


See how the pastry puffs up when the hot syrup is poured over it? The lemons are not only beautiful, but delicious!

Baklava Recipe
Ingredients for Baklava:
- 800 grams ground walnuts of various gradations (100 grams coarsely chopped)
- 100 grams of sugar
- 100grams of raisons
- 1 cup of unsalted, melted butter
- 1 and a little more pkgs of phyllo pastry
Ingredients for Sugar Syrup:
- 600 grams of sugar
- one lemon, sliced
- 11/2 cups water
- 1 and a little more pkgs of phyllo pastry
Instructions for the Baklava:
- Grind walnuts and preheat the oven to 410º F
- Prepare raisins: soaking in warm milk for 10-15 minutes; strain
- Place nuts, strained raisins and sugar into a large bowl; stir until well blended
- Melt butter
- Cover base of Pyrex pan sparingly with melted butter
- Unwrap phyllo dough; place it opposite the pan
- Fold and butter six layers of dough (three pieces of phyllo) as described here:
- place the first layer of phyllo in the Pyrex pan so that 1/2 of its surface area on one side is completely covered with butter, fold it in 1/2, with the buttered side in
- lay it onto the bottom of the Pyrex pan (enough butter remains)
- Continue this process for three pieces of phyllo, or six layers
- Each time butter sparingly the top of the first folded piece of phyllo; place 1/2 of the surface area of the second piece onto the top of the first piece buttered sparingly (this side will be covered with butter); again, fold it in 1/2 with the buttered side in, lay it on the top of the first folded layer where enough butter will remain
- This way, you are buttering sparingly, yet each layer you butter is actually buttering two layers of phyllo
-
Add 1/4 cup of filling and about 1 tablespoon of breadcrumbs every 6 layers (3 pieces) of phyllo until the pan is full
-
Cut the baklava ensuring a strong, clear, clean cut through to the bottom
-
Pour butter down the cuts (just a little)
-
Bake the baklava for 15 minutes at 410º F; start making the syrup
-
Turn the oven down to 375ºF for 35 more minutes, covering the baklava with foil
-
Check on the syrup regularly
Instructions for the Syrup:
- Place the water, lemon and sugar into a small pan and bring to a low boil
- Check it often, but leave it boiling for at least 45 minutes, ensuring it is thick; the colour should not change
- When the baklava comes out of the oven, slowly pour the syrup over all parts of it
- You may have to let the baklava rest a minute or less, and continue again until all parts of the baklava have been saturated in the syrup
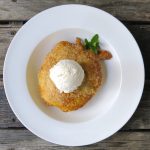
The top of the pastry will puff up and it will look so beautiful you may run for your camera! But, wait until it is completely cooled, and then it will serve beautifully. You will not need to re-cut it, but you will need to use a serving spatula to separate it from the bottom of the pan and serve it. The little pieces around the edge are always the best, as they are the “family” chunks and are usually eaten immediately. The diamonds are saved for tea, company, or dinner!


My husband was delighted. Amina’s husband approved. Sanja was the best teacher, ever! So patient, so relaxed, and so enjoyable.
And, yes, I have made it since. The very next week. The only reason I didn’t post the blog right away is I have been waiting for a photo of Sanja. We completely forgot to take one together that afternoon, so here we are, meeting for another coffee and chat!
 Let me know if you have any different suggestions, or if you try this recipe!
DOUBLE YUMMERS!
[nggallery id=15]


Leave a Reply